Thursday 29 March 2012

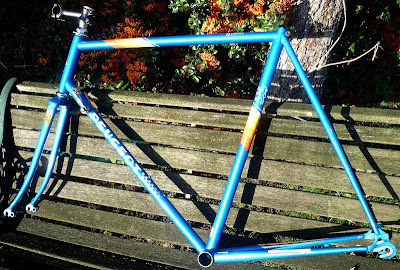
Peugeot Single Speed: more photos

I promised more pictures. Here is a rear view. Now sporting bottle cage, and yes, I preferred the green saddle (it's more comfortable actually).
Here is the internal brake cabling. Basically, just a hole in the top tube!
 The front entry hole.  You can just make out the bar end red LED lights. 
In the evening sun by the side of the road. Lovely!
So far, it's been a real improvement to my daily commute.

Tuesday 27 March 2012

Bike frame material: Is steel better than aluminium, carbon, etc?

Which is the best: steel, titanium, aluminium alloy or carbon? For that matter, what about bamboo and wood?!
Such questions have vexed bike designers for many decades. This post is not about the relative merits of each of these materials for bike frames, as there is plenty of information about that already (one of my favourite resources is here). Rather, I give my views on fitness for purpose and ride quality. I used to believe people who said that aluminium gives a harsh ride, until I bought a good alloy road bike, alloy front forks and thoroughly tested them in cyclocross. In my view, in practice, neither were harsh. I used to believe people who said the type of steel tubing really matters, and those who said 531C is the best, until I realised that it is not that simple. In the 1990s 7 steel bikes, identical except for the tubing, were built and blind tested (see this fascinating article). After much riding and reflection, the reviewer commented that the differences between the steel alloy bikes were very subtle - really rather minor. 

There are many ways to create a bike that works well and suits its intended purpose. Factors such as weight, shape, stiffness, tyres and saddle have a huge impact to how a bike works and feels. Ride quality is determined by so much more than frame material. I think there is a good way to look at this. First of all, think of all the things that make a bike efficient. What makes it go further, faster for less work input by you, the engine?! Then list the things that make your life on the bike more comfortable. After doing that, note that some of the comfort enhancing aspects serve to reduce efficiency, but even so, the increase in comfort may be worth it. So here's what I mean:

EFFICIENCY FACTORS
1. Bearings smooth. To put it another way, a jammed wheel would give atrocious "ride quality"!
2. Stiffness. Frame doesn't flex around when you push the cranks, descend at speed or turn
3. Wheels don't wobble, hop, or flop
3. Tyres have low rolling resistance 
4. A decent engine: rider has appropriate fitness and technique (my grandma ain't as efficient as Bradley Wiggins!)
5. Shape and size
6. Fitting is good, proper muscles engaged
7. Clipless pedals
8. Light weight
9. Aerodynamic
10. Components function efficiently 

Some of which work against the following:

COMFORT FACTORS
a. Tyre size and pressure - fatter, softer are more comfy
b. Saddle type
c. Suspension, whether through flexy frame or actual springs/dampers (which also add weight)
d. No nasty resonant effects - from high frequency teeth rattling vibrations, to scary front wheel shimmies
e. Relaxed seating position and rider view point
f. Contact points feel nice, allow subtle body shifts and position adjustments while riding
g. Components are convenient and comfortable to use

I hope you can see where the frame material fits into this. Basically, it contributes to 2, 8, a bit of 9, c and d. But any of the other factors could ruin the rider's experience of what is otherwise a great frame. Thus, all of the materials listed at the start of this article may be used to make a lovely bike frame that functions very well  - but only under particular conditions. Heavier tubing will make a stiffer bike. Both the load lugging touring cyclist and the road racer want a light, stiff bike but suitable frames are not the same in each case. Carbon fibre is great until it gets whacked or even scratched, when a small defect could make it dangerous through risk of catastrophic failure. Bamboo is natural carbon fibre! Modern super-steel alloys like Reynolds 953 undoubtedly make light, comfortable, strong, stiff, corrosion resistant frames, but so can carbon fibre composite, titanium and aluminium alloys. To underline my point, last season, Zdenek Stybar and Ian Field (world and national cyclocross champions) both used aluminium alloy bikes, while many of their world class competitors opted for carbon frames, but I don't know of any champion racers who used a steel frame. 

Ideally, your choice should be a personal one, based on real evidence and your preferences after test riding. After all, you will be riding the bike, not the person who gave their opinion on the frame material!

Wednesday 21 March 2012

Toe overlap

Is it a disaster if you have toe overlap?
Obviously, wearing winkle-pickers on a small bike with mudguards does not help! But usually, a bit of overlap is not a disaster, because for general riding, steering inputs are small. However, toe overlap can be very irritating, especially at slow speeds where handlebars are turned more. For me, the worst situation is climbing a twisty road. I'm out of the saddle, putting the watts down, going round a hairpin bend, when whack! At worst, I could fall off.

Over the years, I've developed a sense of the front centres measurement that allows my toes to clear the front wheel. Front centres (FC) is the distance from the centre of the bottom bracket to the centre of the front wheel axles - measured very simply with a tape measure. For me when FC~595mm, then I know that in normal cycling shoes and tyres up to 28mm, toe overlap may be marginal. That is, it may be present, or it may not! I also know that when FC~600mm, clearance is more likely.

If you have a bit of toe overlap and want to get rid of it, you could try changing a few things, for example:
  • move your cleats forward a bit, but of course, this may affect comfort
  • use narrower tyres
  • change cranks to shorter ones - not an ideal solution for a few mm gain
  • more radical would be the change the front fork to one with more forward rake
So, toe overlap is not a disaster, but it can be irritating and possibly dangerous. Personally, I don't like it. I try to ensure that there is no toe overlap on any of my bikes, but that said I will keep a bike that I enjoy even if it has a slight toe overlap. 


Sunday 11 March 2012

Peugeot Lautaret Single Speed project - build log

Following on from my earlier update, here is how I built the bike. First of all, I took apart the headset (I've explained in previous posts about the quill-Ahead stem adapter, and funny French sizes):
I want to ditch the ball race cages and use loose balls. With loose balls, the pressure is spread out more within the cups because you can pack more balls in. So, using calipers, I measured the ball diameters:
Definitely 5/32", which is great, because I have some. Reassembled headset with loose balls (this is a view of the bottom cup - the frame is upside down):
Although with a cartridge bottom bracket, a plastic sleeve is not strictly necessary, I cut one out anyway from the Boss's old oregano spice packet:
Trimmed it down to size, making sure that the overlap is at the bottom so that water can drain out through the somewhat massive cable guide hole. Fitted square taper Shimano UN54 113mm cartridge bottom bracket:
Once that was in, I enjoyed some time gleaming up the frame with Simoniz car polish:
Tyres on, wheels on - Tiagra 32h on Omega Mach 1. Fitted the chainset, a Sturmey Archer 44T ally job with steel teeth. This was cheap yet good quality and also had a right side chain guard. Utilitarian, as I intend to use this for commuting. Pedals are MKS resin types for now, again chosen for practical reasons - I could ride this in flip flops - (later I may stick some single-sided SPD touring pedals on):
Using a steel ruler, I measured front chainline, which is from centre of seat tube to plane of chain ring teeth. It was a pretty lengthy 49mm. So, that means the rear cog position would be 16mm from right OLN ((130/2)-49mm). I'm using a Shimino 18T sprocket on a standard cassette type hub to give a gear of around 65 inches. The Velo Solo shims are great, because you can use different thicknesses to set the rear chainline. This is how I measured the rear cog position using two rulers:
After doing that, I did a secondary check on the chainline with a long steel ruler:
Much to my surprise, it was spot on, so the calculation had worked! Then I put the handlebars on. The front brake was a cheepo steel side pull unit off eBay. Rear was an alloy side pull unit (from my box of old unused bits). I also needed some bolt spare parts, again sourced cheaply from eBay. I fitted the brake levers in a position that suited braking from the hoods, as that is mostly how I will ride this bike. I don't want flat bars because I like the greater number of hand positions of drop bars. Fitted the cables, the only interesting thing here is that the rear cable runs into the top tube. I used a hook to pull top tube cable out of interior cable run. You can just about see the rear cable entering the top tube in the photo below [I'll need to get a better photo of that]:
I hooked up a SRAM 8sp chain, estimating length by running it around with the wheel in a forward position in the dropouts, taking account of the length of the Powerlink joining link. I decided to keep the rear hub QR skewer, because when I lock the bike I always run it through the back wheel:
On the front, I fitted a bolted skewer from Halo. Fitted saddle - I'm still umming and ahing over black or green (Charge Bucket, which is a cheepo one that looks a bit like a Turbo). Steel chromed 22.2 seat post. Handlebar wrap with Trek red light bar end plugs - once again, a practical thing for late evening commuting.
The only hitch along the way, was a problem with the seat post slipping (it went down about 1cm during a 1h ride). As a temporary solution, I did the "good old coke can shim thing". First, drink some coke, then rinsed the can and cut it:
Trimmed to fit and inserted inside the existing seat tube shim. Shoved the post in, taking care not to let the shim slide in fully. I did that by cutting slits in the top of the foil, to make tabs that I hooked over the edge of the shim. After tightening the bolt, I then unfolded the tabs:
So that I could trim off the excess carefully with a serrated knife:
Lovely jubbly! So far, the temporary solution has worked well. I've ordered a slightly thicker seat tube shim anyway, but hopefully, I'll never have to use it. I'm guessing that the original seat post would have been around 24.2mm. What a weird size. Let's see how it goes. To continue with the practical theme, I will probably fit some mudguards, but will keep them low profile!

Hope you enjoyed this build - click on single speed conversion project on the right for all the posts on it. It's very satisfying to get an old frame running again. It feels light and comfy and has cheered up my commute a great deal. So far I've got up to about 44km/h on it and at that speed it seemed sure footed enough, although not rock solid like a modern bike. I've surprised myself at the versatility of the 65 inch gear is - I've ground up some decent grades with it now. But most of all, I'm impressed by how efficient and quiet it is to pedal. So silent, that on one ride I was bothered by the noise of a crease in my jersey fluttering in the wind! Never thought that would ever happen!

Friday 9 March 2012

Are integrated headsets inferior?

I don't think so. I'm talking here of fully integrated headsets, where the bearings drop directly into the head tube with no pressed cups to sit in.

In 2002, Chris King published an article called Integrated Headsets Explained which vigorously attacked these kinds of headsets. In his view, they were a flawed design. Note however, that his firm were not producing any, so a cynic might say that he was attacking a competing product type. There was a hot debate about them in the years that followed, for example here. Many took Chris King's side and I can understand that, because his products are lovely and he clearly knows a thing or two about headsets. However, many did not agree with him. At that time, I stayed on the fence, not really knowing who to believe, but more importantly, looking for evidence supporting either side's arguments.

Since then, I've used integrated headsets a lot. After riding them for some years, I've no issues to report. On the contrary, the ease of fitting, smooth running replaceable angular contact bearings, and the clean finish are all superb benefits. Indeed, nowadays, many top notch frames are designed to take them, Colnago, Hope, Cane Creek, FSA, Ritchey and other great bike brands make them.
Most importantly to me, I haven't found any evidence that proves Chris King's allegations against the integrated headset design. In my opinion, for any kind of headset, what really matters, is how well it is fitted, adjusted and maintained.

Peugeot Lautaret single speed project

She's on the road, posing on the verge! These photos were taken on her maiden voyage. The roads were wet, but there was late evening sun. More later, including build details.


She feels light and lively. Just like any lightweight steel frame actually. But the thing that struck me most was the quietness while pedalling. As your legs turn the cranks there's no noise as the chain does its thing. 

Tuesday 6 March 2012

Butyl or Latex inner tubes?

I thought it would be fun to write short opinions on technical subjects. Here is the first one.

Latex tubes roll better than butyl ones. The improved rolling resistance is measurable, quantitatively, for example here. The improvement is real, but relatively small - you could achieve comparable rolling resistance reduction by pumping up the tyre more, or through changing tyres. The competitive edge of latex will be of use to the really top flight racing types. The rest of us have much more to gain through training and improving aerodynamics. There is no weight penalty between the two types of tube, because lightweight butyl tubes are available that compare well with latex ones in grams. In qualitative terms, I find latex tubes more comfortable. They have a wonderful "squishy, yet fast" feel to them. In contrast, butyl tubes give a "harder, harsher" ride. Another factor is that latex tubes need to be pumped up more regularly - pretty much every day - as they do not retain air as well as butyl tubes. I've also noted an odd wear issue with latex tubes. See the photo below which shows some kind of plastic deformation on the inside of the tube - I never figured out the cause.
I had to chuck this one after just a few months use, despite the fact that I had run butyl tubes in the same wheels and tyres for much longer with no issues.

So, if you want fast, comfy tubes with improved rolling resistance and can put up with the extra maintenance hassle, then go for latex. But if you can't be bothered with the extra maintenance (both in terms of time and expense), then stick to butyl.

Wednesday 29 February 2012

Cutting a steerer tube

Before and after photos of the steerer on my Iceni TT bike. It was too long, but I wanted to leave some spacers above the stem, in case the bike ever is converted back to a road bike. Before:
 After. Now that's much safer!
After removing the required number of spacers, I scored the steerer tube. Then put the pipe cutter in place, 3mm below the scored line. 


 Had to remove the stem in order to be able to rotate the pipe cutter.

Took the fork out (carefully placing the headset parts on a sheet, so as to not lose their order). Then, knock in a new star fangled nut. I use an old screwdriver in the hole, but there are great dies for it. Also, when hammering it, I support the fork in my hand under the crown. That way, you are not risking hammering when the forks are braced against the ground!

 I love this top cap. I had a Ritchey one before, but this looks way cooler. I'll need that when I'm sweating on top of it during my next TT!

Cyclocross wheels from Hewitt

A year on, the folding bike wheels that Hewitt built up for me are still going strong. They are in daily use, straight as they were the day they arrived, with no loose or broken spokes. Filled with that confidence, I decided to get my primary CX racing wheels made by them too. First, I de-spoked my Shimano 105 hubs from their old, worn, Mavic MA3 rims, and serviced them. Front hub:
 Then the rear one. I tend to open the nuts on one side only, and then draw the axle out.
The balls were ok, just needed stripping, cleaning, re-greasing and re-assembly. I tried to work some thick oil into the freewheel too.
A few weeks later, beautifully built by Hewitt on Mavic CXP33 rims:
 The spoke lacing and tension is simply excellent.
Hewitt have a reputation for quality wheels for a good reason. I can't wait to ride them and will update this post after I have done so.


Monday 27 February 2012

Update on Peugeot Lautaret Project

I've decided to build up the Peugeot Lautaret as a single speed. No dangly mechs or levers! Opting for freewheel, not fixed. Here's a photo:
I sprayed frame saver inside the tubing. The HLE tubing material is interesting (those d/t levers will be coming off btw):

It's Peugeot own brand "Haute Limite Elastique". A USA 1987 Peugeot brochure that I found online describes it as follows:

"HLE Tubing: HLE is Peugeot's exclusive alloy tubing. It is a "micro alloyed steel" which is comprised of Manganese, Niobium, Aluminum, Carbon and Titatium[sic], which offers a lighter, yet stronger frame. These elements are commonly used in the production of aeronautical steel. The introduction of these elements results in a steel with dramatically improved mechanical properties when compared with more conventional steel. The strength to weight ratio of HLE tubing is far superior to that of conventoinal tubing. Using this tubing enables Peugeot to save more than 7 ounces in the weight of the frame. The HLE tubing, when used with our patented internal brazing system, gives Peugeot a frame which is at the top of its class in performance and reliability."

SEAT TUBE
As best as I could measure it, the seat tube inner diameter was 24.0mm. An odd size, and I could find no post to fit. So, I obtained a shim with 1.8mm thickness, to narrow the internal diameter to 22.2, the rationale being that this is a more common size for seat posts. Here are some photos (the shim is a black, USE brand):
Since the shim was for a larger diameter, I had to trim it along one edge and squeeze it in:
I have a cheepo 22.2 steel seat pin, and it fits beautifully. I may try to find an alloy one. The seat post clamp is a traditional steel nut and bolt type, which is less likely to damage a steel one when tightened.

STEM
I have a solution for the steering end. I sold the quill stem that came with the frame because modern handlebars didn't fit the clamp. It went on fleabay for £5.99. Since I bought the whole package originally for £13.10, that means the frame cost me £7.11! I got hold of a 11/8-22.2 quill-Ahead adapter. Luckily the adapter tube fitted perfectly inside the steerer, but the expander wedge was a bit too wide (probably 22.2). As the wedge was alloy, I was able to reduce it to fit using AlOx paper. The stem is a modern type from M:part, with a 25.4 clamp, perfect for the handlebars.


SINGLE SPEED CONVERSION OPTIONS 
Here is a summary of what I've been mulling over. Over the last few weeks, it was useful that I spotted some 1980s racing bikes parked in public places that had been converted to s/s. I've seen three different approaches:

1. Replace the multi-speed freewheel with a single speed freewheel, simply screwed on to an old style threaded wheel hub. Predictably, with a single chainset, the chainline is rather angled. It was not a very good solution for one of the bikes I saw. It could be made to work if the freewheel was shimmed out a bit, and at the front, one could use a shorter BB axle length and a different chainring that fits to yield a shorter chainline (that is, closer to the seat tube). One bike I saw achieved a good chainline by using the inner ring of a double chainset up front.

2. Keep the screw-on multi-speed freewheel, and use a single chainring at the front. I guess one selects the sprocket that gives the best chainline, so it may be a lottery to get a useful gear ratio. The one I saw had a super straight chainline. Not bad and a cheap solution. But the 6 speed freewheel is a heavy-ish rotating weight, five other cogs are spinning around unused. Not so elegant!

3. Use a modern cassette hub wheel, shim it up to take a sprocket on the back, with a single chainring up front. This is less dependent on the chainset and BB, as the back end sprocket position may be adjusted with shims.

I've bought my chainset, because it was a total bargain and suited a Shimano UN54 113mm square taper BB that I have in my spares box.  It's a Sturmey Archer single with 44T.  When I fit it I'll measure the chainline first, so that I have a reference to work from. It could be that Option 1 may not be possible. We'll see. I appear to have all the parts needed to try each of the above solutions.

Interesting thing is that standard 130mm rear hubs fit with just a slight hand springing of the rear dropouts. I guess it's only 2mm each side that needs to be sprung! The HLE rear stays are rather more flexible than those on modern frames. I'm guessing the ride will be soft. Anyway, next steps are to service the head set, fit the BB and shine up the frame with car polish...Photos later as I progress.


RECOMMENDED LINK
Velo Solo - A totally brilliant website for riders interested in single speed conversions. The online shop has superb photos, so that you can see exactly what you're ordering. Really worth visiting, even if just for idea-generation.

Wednesday 1 February 2012

Graham Weigh Cyclocross Frame - Update

Here's an update on the bike I built up a few months ago.
And racing - bit of fun blurring up my face there! 
The steerer has been cut down to my preferred height. I used a Rothenberg pipe cutter for this - great tool - I'd recommend it. Saddle is a ProLogo Kappa, not expensive and fine so far for cyclocross, if a bit narrow for my "a-few-too-many-puddings-hips". Wheels are Mach1 Omega rims on Shimano Tiagra, 32h, shod with Michelin Mud 2 folding tyres - cheap as chips and go ok. There's a seat pack which obviously will be removed for racing. I've enjoyed this bike - three races so far, and all is well.

 That's the end of this 'cross season. I'm really looking forward to the next one!

Thursday 5 January 2012

Commuting bike for £15

Here's a photo of the Concept Excelsior that I bought on eBay for £15, on its first day as a London commuter. 

I fitted mudguards which were lying around unused at home (you can see that they were for 700c wheels, not 26", but they will work fine). Other than the longer seatpost and cheepo saddle, no new parts have been fitted. Since the front shifter was knackered, I removed the gear cable and adjusted the mech to middle ring (38T). After lubrication and cable tension adjustment, the 5 rear gears work reliably now. Basically, very little cost and work to get this roadworthy and working at an acceptable standard. The chain had surface rust, but was not stretched - in fact, it seemed hardly used. So, I wire brushed it and thoroughly oiled it. Gearing is perfectly sufficient for London. First impressions are that it rides well, but is heavy. After winter, I'll fit lighter, narrower, touring type tyres, and that will help a fair amount. 

Thursday 22 December 2011

Heart Rate on a time trial "out and back" course


I think this is a great chart of heart rate data against time. It compares my heart rate during an "out and back" time trial event, but 2 years apart. The red data is from earlier this year. Black is on the same course but 2 years ago in 2009.  This year I was faster by almost 2 minutes and set a personal best for this course. The data tells me at least three things:

1. I could have tried much harder this year. Especially during the second quarter and last quarter of the race.

2. On an out and back course, wind will usually reduce the overall time. (There's plenty of stuff online that explains why). This year there was more wind than in 2009, and it was a tailwind on the way out and head wind on the way back. This is clearly evident in the data, the dip in HR being the turn point. Indeed, in 2009, it seems I was actually quicker on the return leg, but slower overall.

3. Considering the above observations, it's great that I'm faster this year! This must be combination of training and equipment - but I like to think more to do with training than equipment :)

4. Older does not mean slower!

The data is very informative and makes me feel that I can improve further. It was gathered using Garmin FR60 heart rate monitor, which I think samples heart rate every 5s. Yes, I know this blog is about working on bikes, but working out on bikes has got to be included in that!

Thursday 15 December 2011

How to service a bicycle

I'm about to sort out the Concept Excelsior hybrid bike, which let me gloat again, I bought for only £15 (see my previous post on that). I thought it may be useful to jot down a checklist of things to do. Now, there's no real need to do these all at once. Actually, I see this exercise as a fact finding mission, so as to understand every part of the bike. I then prioritise the areas to service first. In this particular case, I do not want the bike to look pretty, as it's going to be used for commuting and parked in various locations in town. So with that background, here's the full list:
  1. Frame - external: Inspect it all over, look for cracks, dents, corrosion, twists, bends, any defects really. Special care around the fork areas. It may be convenient to do this while washing the bike with a sponge and soapy water. Do ensure that it's rinsed well with clean water though, as most soaps contain salt that encourages corrosion. At worst, you may have to get something welded if steel, or end up chucking the frame because of a previously unseen crack.
  2. Frame - internal: Look inside, where ever possible - down seat tube, look at drain holes in the forks and stays, inside the head tube. When bike is completely dry, spray frame saver inside, or at least Waxoyl. Remove bottle cage bolts to get the spray tube into the down tube.
  3. Saddle and seatpost: Is the saddle tatty, comfortable, or hurty? Loosen the seat post bolt, take the post out. Hopefully, that will be easy, but sometimes it's jammed. In which case, spray some WD40 or Plus Gas around the top of the seat tube, allow to penetrate, then try again. Once out, clean the inside of the seat tube with a rag using a stick as a ram rod. Clean and grease the seat post, bolts and nuts, apply a bit of grease inside the top of the seat tube too, then re-assemble and adjust to the right height and angles. In a year's time, you'll be thankful you did this!
  4. Steering: For a quill stem, do as for the seat post, ensuring especially that you grease the long bolt. I also grease the faces of the stem and the expander wedge where they slide together and very sparingly around the post and in the tube. The idea is that it should not jam later, when you want to remove it, but also, should not slip when you tighten it up. For Aheadset type systems, you need to check that the bolts at both ends of the stem are tight - but rather than stripping them by overtightening, it's probably much better to loosen them all, grease and then tighten up. The bars should turn fully and freely in each direction.
  5. Headset: May well be fine. Stand over the top tube, bend over the handlebars, put the front brake on, and rock back and forth, with your weight on the bars, checking carefully for play in either top or bottom bearing. Turn and feel for roughness. It may be easy and perfectly sufficient to wind the lock rings up a few turns, squeeze some grease into top and bottom bearings and tighten it all up. A more thorough service may be fairly easy - dismantle it, clean, grease and rebuild, and you may have to change the ball bearings or races. It's up to you! At worst, you have to change the headset, which can be a pain if you can't seat the crown race or top and bottom cups easily, but in that event, your LBS should be able to help you out if it needs a full replacement.
  6. Wheels: Loose, or much worse, broken spokes should be sorted out sooner rather than later. Check condition of the rims - how worn are they, how much life is left in them? Never risk running rims that are wearing out - look for wear lines or other indicators. Examine the hubs carefully, especially around the spoke holes. Any cracks or signs of imminent breakage? Are the bearings ok? Waggle the wheels - is there any play in the hub bearings? Again, you may need to strip and rebuild, but a quick tighten up of the axle nuts may be enough for now, the full service not being urgent. Next time you get the tyres off, check the rim tape and the spoke heads too. It may be worth oiling them, to make tension adjustments easier in future. Is it too obvious to say that you must check that the wheels are firmly fixed to the forks?! Track nuts, quick releases, whatever. Grease and lube wherever you see fit!
  7. Tyres: Check for cracks, splits, holes and general wear and tear. Nowadays, I tend to make a washer out of an old inner tube, and put that on the valve before fitting it in the tyre. This stops the edges of the valve hole in the rim cutting into the valve base. But these things can wait until the next time you take the tyres off.
  8. Brakes: Very important area this. Pads must have some decent thickness to them. Old pads can be revived with a file, or just rub the face on a cement floor or brick side. Need to get any bits of metal that may be embedded in them out! Oil everything that has a pivot - including the brake levers. I also oil cable entry points. Adjusting angle of the pads and ensuring that they move uniformly and hit the rims evenly can take time, especially with cantilevers, but it's well worth it. Toe in if you have to eliminate squealing. I use a bit of card at the back of the pad while tightening it up.
  9. Pedals: Ensure they spin freely and aren't mangled up. Angle them and try to dribble some oil in the bearings. Do they suit your shoes!?
  10. Bottom bracket: Grab hold of the crank arms and wobble them, holding the frame still. Do it while riding the bike too, with your feet on the pedals. Examine rings and cups to check they are tight. At best, it'll be fine, especially if it's a cartridge type. If not, either change the cartridge or service the axle and bearings.
  11. Chainset: Clean, inspect the teeth for wear. Are rings bolted on securely? Check the cranks for cracks, especially around the pedal axle area. Are the cranks well secured to the bottom bracket axle? It's worth releasing them, cleaning, and re-fitting them securely. This will stop you cursing later when you want to get them off but can't.
  12. Chain: Clean, inspect, lubricate (see my earlier post for full details).
  13. Front and rear mechs: Clean and oil, ensure they move back and forth smoothly. It's very important to ensure that the L and H settings are adjusted properly, for safety. Otherwise the chain can come off and jam somewhere, causing injury possibly.
  14. Shifters: Clean, and lubricate, but with care! Putting oil in the wrong places on some shifters can cause problems - e.g. slipping. Seek expert help for tricky things like STIs or Ergos. Check condition of cables, replace if necessary, and lube or grease cables at entry points. An easy one is the under bottom bracket cable guide - clean it and oil it.
  15. Freewheel/Cassette: Remove debris, clean up, inspect for wear. Are teeth worn down or fresh looking? Try to lubricate freewheels with a good quality oil - need to exercise some gymnastics to make it dribble around inside to get to the moving parts.
  16. Make notes: I think this is worth doing, and easy as you go over the above items. Frame number, dimensions, gear teeth numbers, all useful information that you may need to refer to later. A few years ago, I started to log my maintenance work in a spreadsheet document on a pc. I've found it more useful than expected - like informing me as to spoke breakages on a particular wheel, and creaking noises - information that gave me clues about other matters that needed to be fixed. 

Sunday 11 December 2011

Peugeot Lautaret and Hybrid commuter projects

Found a couple of bargains on eBay. Here is a lovely Peugeot Lautaret frame (£13.10):

After studying it carefully, I'm pretty sure it's from 1987, as this is the date stamped on the Sachs Huret down tube shifters, and according to brochures online, the rainbow paint scheme is from that era. It's marked 12 vitesses, and the tubing is Peugeot own brand HLE, neatly internally brazed (no lugs). Paint is in great condition. The BB seems to be English 68mm, the seat tube is weird size, probably a 24mm diameter, and the stem is a 22.0 French jobbie. Rear dropout spacing was 120mm, but it was pretty clear that someone had cold set it unevenly. By sighting down the seatstays, one could see that the right hand stay had been pushed in. I gently pulled it back to its original 126mm spacing. Now to figure out how to build it up - single speed or 6 speed? I'm certainly going for a single chainwheel up front. Options, options...

Second bargain is a Concept Excelsior 15 speed hybridy mtb type thing (£15):

Judging by the condition of the chainset, sprocket teeth, tyres, rims and brake pads, it's HARDLY EVER been ridden! A label on it says "Designed in England by Concept Cycling Ltd" and another "Mega Carbon Steel". The frame feels bomb proof. I know nothing of Concept Cycling Ltd, but a quick Google search tells me that it went bust in around 2005 and is now part of the Avocet Group, with Viking and other brands. The chain was rusted and wrapped round the 5 speed block. But it was simple to unwind it, lube it and in 10 minutes, it was back in rideable shape. It rides fairly well actually. Front twist grip changer is knackered completely. I adjusted the L set screw on the front mech to put the chain in the middle ring (38T) for now. Rear twist grip shifter is ropey, but seems to work in a fashion. There's a straight chainline with the middle ring at the front and the second smallest sprocket at the back (17T), which is ~58". I'm wondering whether to lose the rear mech completely, fit mudguards and make this a single speed commuting hack using existing cogs and rings (it has sloping dropouts). But I'll need a longer seatpost first. At least it's a standard ish size: 25.4mm.

Will post more photos as I sort these out. But first, allow me to revel in getting a frame and a functioning bike for a grand total of ~£28. I feel smug! Marvellous. Thanks eBay!