Showing posts with label bottom brackets. Show all posts

Thursday, 1 April 2021

Chuck's Tech Opinion: How to decide what to keep and what to change on a Raleigh Twenty, and Pedals!

As you work on a Twenty, you start to get a feel of the engineering. I find it useful to categorise: some parts are really well thought out and function well, others are merely adequate for their job and there's another category of redundant, useless, or poorly designed stuff. Then layered over that, some parts have elegance, possibly even beauty, while others are downright ugly. Add yet a further layer, namely weight, and a recipe emerges as to how to go about deciding what to keep and what to change. 

Take the pedals. In the photo below (starting top left and going anti-clockwise): originals off a BSA 20, modern MTB style polymer flatties (BBB brand) and a generic polymer trap-type pedal:


Both the modern pedals have reflectors, today a legal requirement for safety, whereas the R20 pedals do not. Now, this R20 pedal has a certain elegance, it's true, but it's also narrow. Uncomfortable over a length of time, especially in soft soled shoes, as your feet curl over it. The weights add another factor:

Pedal type g per pair
R20 651
MTB Flatties 336
Polymer Cage      286

I think it's remarkable that the old R20 pedals weigh so much, nearly 1.5lb! I discarded the polymer cage, for two reasons: the bearings on one were notchy and I didn't like the style for this bike. I thought it would be funky to have the MTB flatties. Apart from the beautiful wide platform they provide, the reflectors for safety and the weight saving (a stonking 315g), they are also shorter (12.1 cm v 11.0 cm from crank to pedal tip) and thinner, both of which reduce the chance of a pedal touching the road in a corner. So, my choice is made to switch to the MTB Flatties. 

That all sounds great, but then I tried fitting the MTB Flatties and to my surprise while the diameters were comparable (9/16"), the threading was different! I wondered whether the cranks had some old English threading, but that seems like an odd explanation, because I've managed to get modern pedals on a R20 before and know that others have too. More likely, perhaps the threading tooling that Raleigh used was slightly different to modern standard. It could be just some R20s that were like this. I tried a few pedals and I found that most of them were too tight, but one or two modern pedals went in ok, but only on one crank. Whatever the reason, after playing about a bit with modern pedals, I now feel that for this project, I will stick with the original pedals. They are a basic, but serviceable design. The end cap prises off carefully with a thin screwdriver. Underneath, two spring clips and a washer to remove:


There are no BBs just a plain bearing. The axle at the top simply slides into what looks like a tapered sleeve in the pedal, then the washer with flats is added and the two spring clips to hold it all down. This one was gummed up and a quick clean and regrease worked wonders. They spin super smoothly now. At least they are hardly worn and have plenty of service to give. They'll clean up ok and add to the retro look. 

Now consider the light bracket:


What an ugly lump that is, and given modern lights, it's redundant too. It serves a purpose in the headset, that is to increase stack height by a few mm in order to prevent the top lock nut from bottoming out. But that function can be easily achieved with a small standard spacer. How much does this monstrosity weigh? 77g! That's about the weight of SEVEN AAA batteries! Wowsers. Guess where that's going? Yes, in the recycling bin. NB, you have to remove the front brake caliper to get the stem out in order to lift this off the headset (see my post a few days ago on that wire loop thingy that restricts the movement of the stem vertically).

Note that by just by changing pedals and ditching the light bracket, you could save nearly 400g. Astonishing. 

You can repeat this thought process for every other item on the R20, using the factors I suggested at the top of this post (I'm not considering maintenance items, such as brake pads, tyres, BBs, chain and cables):

Sturmey Archer hubs (both the front one and the rear epicyclic AW gear unit): 
Elegant, well thought out, very functional, design kudos, unique, a bit heavy, but worth it! Pretty when clean and polished! I would keep these in nearly every case, unless there was a radically different vision for a particular build. 

Chainset: 
They are not all the same. Some patterns are indeed beautiful, others look more functional, but they have some eye appeal, I like the stamped "Nottingham Knight". They function well if you can deal with cotter pins and can live with the heavy chromed steel.

Bottom bracket:
It's perfectly functional, and isn't heavy, so in my view, this comes down to condition, and how important it is for you to change the chainset/eliminate cotter pins. The axle is a solid thing, and very rarely needs replacement. So, a good service with new BBs is usually all that's needed if you stick with cottered cranks. However, if you want to open up the world of square taper chainsets, then I believe that the simplest and best option is to find a square taper axle that fits and retain the same bottom bracket cups and 1/4" BBs. If that's not possible, then face the shell to 73mm or even 68mm (the width of my BSA 20 shell is 77mm as best as I could measure it), and rethread to standard 24 tpi. Some say that you should fill the threads with with a suitable molten metal before re-threading, but I've also read that many people have had success just rethreading directly, but slightly deeper than the original threads. Clearly a specialist's job. Failing any of those, then a problem solver may be a new threadless (friction fitting) unit. 

Saddle:
Really ugly, uncomfortable for me, and enormously heavy! It's gotta go. 

Seatpost:
Ugly, too short for many people, and very heavy, especially being steel with the steel clamp. Easy swap out to a modern one 28.6 usually. It's gotta go. 

Chrome steel Handlebars and Stem
Function ok, and have a certain elegance. However, they are really rather heavy and often this is were customisation and your personal vision take over. A quill stem, with alloy riser bars, or bullhorns, etc. 

Hand grips:
Yeuk! Hard ugly plastic and short. The only positive thing I can say about them is that they are hard wearing. But, I really think they have to go in just about any project (save for a restoration to original spec). 

Chrome steel rims:
Work ok, but do not brake as well as alloys, especially in the wet. Look nice when clean and polished up. Heavy! My front wheel without nuts, rim tapes, or tyres weighs 940g. With rim tapes, tyres and nuts it weighs 1547g. Go or stay? It's really one of preference and also considering the condition of the steel rims that you have, the hassle of doing a rim swap, or finding/building another wheel that fits and also brakes that work with them. On the other hand, if you're not accelerating and braking a lot then, a heavy wheel provides a nice flywheel effect for steady riding - which is what I tend to do on a Twenty. 

Nylon bushing top part of the headset: 
Functions just about adequately, especially if you get a chance to clean it and lube the surface that touches the steerer, and adjust the headset properly. Once the light bracket is off, there's not much in the weight. So this one is a matter of preference again. This photo is of my current project, rust cleaned off and polished. I've kept the Nylon bushing, but ditched the light bracket (hence the black spacer):


Another approach is to remove the Nylon bushing and install the top half of a 1" threadless headset. When I do that again in the future, I'll be sure to take enough photos and post them on this blog. 

Frame: 
It wouldn't be a Twenty without one! It's a classic, has got to stay.

Forks:
They are designed to fit the cone flanges of the Raleigh Sturmey Archer front hub and they work well enough. A bit heavy. I think this one is mainly down to whether you keep that front hub or not. Also whether you want to do something funky, like BMX forks for 451 or 406 wheels or suspension forks. In which case, you can also change the whole headset. 

Paintwork:
What condition is it in, and do you like it? Will it clean up nicely (after a wash, T-Cut and car polish)? Simple as that. 

Clamps and Locking levers on steerer and seat tube:
These function adequately if well-maintained and positioned properly (evenly over their respective tubing slots). They add a bit of weight, but also provide easy quick adjustment. Also, if you are fitting a quill stem, the front clamp becomes unnecessary and can go (or stay!). So it's really up to you. 

Brake caliper units:
Can function adequately if you take the time to set them up well, and they polish up ok too. Remove rust with WD40 and 0000 steel wool, chrome polish, lubricate and fix and adjust them properly. Use fresh cables. In many instances, I've changed only the inner wires, as the outer cables were fine. If the ends of the outer cables are kinked, you can snip off 5-10mm cleanly and that will improve the performance quite a bit. Modern alloy units would be an improvement and weigh less, but I think this one is really a matter of preference.  Here's a front caliper, with rust cleaned off one arm, but not yet the other one:


Brake levers:
In my view they function adequately, and being steel are better than plastic levers! But there are lighter and better modern alternatives. So, it's a matter of preference for your particular build I think. 

Mudguards (Fenders):
Functional, but do not have the break-off arms for safety as modern ones do and are relatively heavy. Must mount them properly and securely, or those beefy mounting arms could foul a wheel and cause a bad accident. I'm powder coating mine on this build.  

Chainguard:
Serves a function (keeping your trouser leg clean!) and has a certain appearance. Don't weigh a great deal, but grams are grams. It's up to you! I'm powder coating mine on this build.  

As I've said before, the Raleigh Twenty is like a blank canvas to a bike builder! The Raleigh bronze green BSA 20 that I'm working on at the moment is going to retain most of its original components, but with modern contact points (pedals, saddle/seatpost and hand grips). The next one may be a light weight with funky bars and alloy rims, but I haven't clearly figured out my direction on that one at this time.  

Go with your heart and desire, enjoy the process, and all will be ok. Be creative, be artistic! 

Wednesday, 31 March 2021

Raleigh Twenty: To powder coat or not?

When I got this bike, it was dirty and grimy looking. My first thought was to strip the paint and get it powder coated. However, after working on it for a while, I realised that the parts with the worst paintwork (chips and rust) were the mudguards (fenders) and the chain guard. These have been removed and sent off to my local powder coaters for prepping and application of a contrasting colour. In the meantime, I washed the frame, applied T Cut to the paintwork, and have been working on polishing up and servicing the components (see last few blog posts on the chainset, bottom bracket and wheels). Today, for the first time, I whacked a bit of regular car polish on the underside of the frame and hey presto:


Not bad for paint that is 33y old, I think you'd agree! It vindicates my decision to not strip this frame. 


Now I'm keen to polish the rest of it, but there's a lot to do before that, such as removing rust from the brake calipers and levers, figuring out what I want for pedals and hand grips. In the photo, you can just see the 1970's cream plastic hand grip. Compared to modern bar grips, these are ugly, uncomfortable and undersized!  


Wednesday, 24 March 2021

Raleigh Twenty Steerer Restrictions and Bottom Bracket

There are two mechanical restrictions on the steerer assembly of the Raleigh Twenty, here, a BSA 20. 

VERTICAL RESTRICTION

As promised in an earlier post, here's a photo underneath the steerer, looking between the front forks: 

You can see the wire wrapped around the main brake bolt. The wire also attaches to the stem:


The wire could be copper or some kind of bronze. Here's a close up of wire twisted up around a pin in the stem:

The wire's function is to prevent the stem from being completely pulled out of the steerer tube. At the top of the first photo at the start of this blog post, you can see the bent plate chromed bracket on the brake bolt, sitting snug against the front of the forks. 

ROTATIONAL RESTRICTION

Here is another view of that bracket, this time from above:

If you don't know what the bracket's for, then you may think it to be some kind of "English decorative curio", or a basket attachment! But I hope this picture helps you to understand the function of the odd shaped bracket. As the handlebars are turned, the bracket "folded hands" hits the metal welded C shape plate behind the head tube. So, the steerer stop bracket and that welded C shape plate on the back of the headtube together provide a mechanical restriction to the range of movement of the forks. 

I believe that both of these steerer restrictions were intended as safety features, but I'm not certain of that.

CRANK REMOVAL & BOTTOM BRACKET SERVICE

I also took off the cranks for servicing the bottom bracket. The non-drive side cotter pin came off easily. But the drive side one was stuck like a pig. Removing a seized cotter pin has got to be my most unfavourite bike mechanic job! I had to drill it out, and it was a real struggle. Here is the first pilot hole: 

You've got to use something as cutting fluid (I used 3in1 oil). I then followed up with wider diameter drills and finally after much hammer dynamics, got the *#*£$@! out (one day later!). 

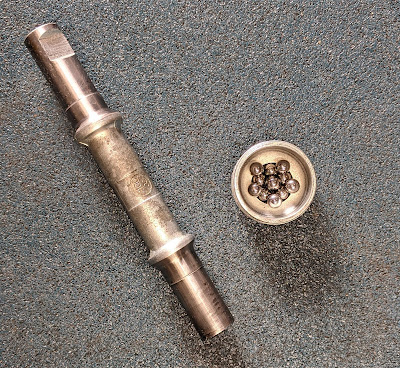
And I finish with some photos of the BB shell, axle and cups, apart and reassembled. The axle is 14.2cm long, and measures about 6cm between cones. There are 11 balls of 1/4" on each side. It's clear that this bike was not much used, which makes it a great candidate for a clean up and service. Restoration using as many of the original parts as possible.


I think the drive side cup is welded in - in any case, I didn't bother trying to remove it. Now I just need to find some new cotter pins, which as far as I can tell are 3/8" in diameter. Whether or not it's considered right, I WILL use some copper anti-seize when I fit them. 

Sunday, 11 March 2012

Peugeot Lautaret Single Speed project - build log

Following on from my earlier update, here is how I built the bike. First of all, I took apart the headset (I've explained in previous posts about the quill-Ahead stem adapter, and funny French sizes):
I want to ditch the ball race cages and use loose balls. With loose balls, the pressure is spread out more within the cups because you can pack more balls in. So, using calipers, I measured the ball diameters:
Definitely 5/32", which is great, because I have some. Reassembled headset with loose balls (this is a view of the bottom cup - the frame is upside down):
Although with a cartridge bottom bracket, a plastic sleeve is not strictly necessary, I cut one out anyway from the Boss's old oregano spice packet:
Trimmed it down to size, making sure that the overlap is at the bottom so that water can drain out through the somewhat massive cable guide hole. Fitted square taper Shimano UN54 113mm cartridge bottom bracket:
Once that was in, I enjoyed some time gleaming up the frame with Simoniz car polish:
Tyres on, wheels on - Tiagra 32h on Omega Mach 1. Fitted the chainset, a Sturmey Archer 44T ally job with steel teeth. This was cheap yet good quality and also had a right side chain guard. Utilitarian, as I intend to use this for commuting. Pedals are MKS resin types for now, again chosen for practical reasons - I could ride this in flip flops - (later I may stick some single-sided SPD touring pedals on):
Using a steel ruler, I measured front chainline, which is from centre of seat tube to plane of chain ring teeth. It was a pretty lengthy 49mm. So, that means the rear cog position would be 16mm from right OLN ((130/2)-49mm). I'm using a Shimino 18T sprocket on a standard cassette type hub to give a gear of around 65 inches. The Velo Solo shims are great, because you can use different thicknesses to set the rear chainline. This is how I measured the rear cog position using two rulers:
After doing that, I did a secondary check on the chainline with a long steel ruler:
Much to my surprise, it was spot on, so the calculation had worked! Then I put the handlebars on. The front brake was a cheepo steel side pull unit off eBay. Rear was an alloy side pull unit (from my box of old unused bits). I also needed some bolt spare parts, again sourced cheaply from eBay. I fitted the brake levers in a position that suited braking from the hoods, as that is mostly how I will ride this bike. I don't want flat bars because I like the greater number of hand positions of drop bars. Fitted the cables, the only interesting thing here is that the rear cable runs into the top tube. I used a hook to pull top tube cable out of interior cable run. You can just about see the rear cable entering the top tube in the photo below [I'll need to get a better photo of that]:
I hooked up a SRAM 8sp chain, estimating length by running it around with the wheel in a forward position in the dropouts, taking account of the length of the Powerlink joining link. I decided to keep the rear hub QR skewer, because when I lock the bike I always run it through the back wheel:
On the front, I fitted a bolted skewer from Halo. Fitted saddle - I'm still umming and ahing over black or green (Charge Bucket, which is a cheepo one that looks a bit like a Turbo). Steel chromed 22.2 seat post. Handlebar wrap with Trek red light bar end plugs - once again, a practical thing for late evening commuting.
The only hitch along the way, was a problem with the seat post slipping (it went down about 1cm during a 1h ride). As a temporary solution, I did the "good old coke can shim thing". First, drink some coke, then rinsed the can and cut it:
Trimmed to fit and inserted inside the existing seat tube shim. Shoved the post in, taking care not to let the shim slide in fully. I did that by cutting slits in the top of the foil, to make tabs that I hooked over the edge of the shim. After tightening the bolt, I then unfolded the tabs:
So that I could trim off the excess carefully with a serrated knife:
Lovely jubbly! So far, the temporary solution has worked well. I've ordered a slightly thicker seat tube shim anyway, but hopefully, I'll never have to use it. I'm guessing that the original seat post would have been around 24.2mm. What a weird size. Let's see how it goes. To continue with the practical theme, I will probably fit some mudguards, but will keep them low profile!

Hope you enjoyed this build - click on single speed conversion project on the right for all the posts on it. It's very satisfying to get an old frame running again. It feels light and comfy and has cheered up my commute a great deal. So far I've got up to about 44km/h on it and at that speed it seemed sure footed enough, although not rock solid like a modern bike. I've surprised myself at the versatility of the 65 inch gear is - I've ground up some decent grades with it now. But most of all, I'm impressed by how efficient and quiet it is to pedal. So silent, that on one ride I was bothered by the noise of a crease in my jersey fluttering in the wind! Never thought that would ever happen!

Monday, 27 February 2012

Update on Peugeot Lautaret Project

I've decided to build up the Peugeot Lautaret as a single speed. No dangly mechs or levers! Opting for freewheel, not fixed. Here's a photo:
I sprayed frame saver inside the tubing. The HLE tubing material is interesting (those d/t levers will be coming off btw):

It's Peugeot own brand "Haute Limite Elastique". A USA 1987 Peugeot brochure that I found online describes it as follows:

"HLE Tubing: HLE is Peugeot's exclusive alloy tubing. It is a "micro alloyed steel" which is comprised of Manganese, Niobium, Aluminum, Carbon and Titatium[sic], which offers a lighter, yet stronger frame. These elements are commonly used in the production of aeronautical steel. The introduction of these elements results in a steel with dramatically improved mechanical properties when compared with more conventional steel. The strength to weight ratio of HLE tubing is far superior to that of conventoinal tubing. Using this tubing enables Peugeot to save more than 7 ounces in the weight of the frame. The HLE tubing, when used with our patented internal brazing system, gives Peugeot a frame which is at the top of its class in performance and reliability."

SEAT TUBE
As best as I could measure it, the seat tube inner diameter was 24.0mm. An odd size, and I could find no post to fit. So, I obtained a shim with 1.8mm thickness, to narrow the internal diameter to 22.2, the rationale being that this is a more common size for seat posts. Here are some photos (the shim is a black, USE brand):
Since the shim was for a larger diameter, I had to trim it along one edge and squeeze it in:
I have a cheepo 22.2 steel seat pin, and it fits beautifully. I may try to find an alloy one. The seat post clamp is a traditional steel nut and bolt type, which is less likely to damage a steel one when tightened.

STEM
I have a solution for the steering end. I sold the quill stem that came with the frame because modern handlebars didn't fit the clamp. It went on fleabay for £5.99. Since I bought the whole package originally for £13.10, that means the frame cost me £7.11! I got hold of a 11/8-22.2 quill-Ahead adapter. Luckily the adapter tube fitted perfectly inside the steerer, but the expander wedge was a bit too wide (probably 22.2). As the wedge was alloy, I was able to reduce it to fit using AlOx paper. The stem is a modern type from M:part, with a 25.4 clamp, perfect for the handlebars.


SINGLE SPEED CONVERSION OPTIONS 
Here is a summary of what I've been mulling over. Over the last few weeks, it was useful that I spotted some 1980s racing bikes parked in public places that had been converted to s/s. I've seen three different approaches:

1. Replace the multi-speed freewheel with a single speed freewheel, simply screwed on to an old style threaded wheel hub. Predictably, with a single chainset, the chainline is rather angled. It was not a very good solution for one of the bikes I saw. It could be made to work if the freewheel was shimmed out a bit, and at the front, one could use a shorter BB axle length and a different chainring that fits to yield a shorter chainline (that is, closer to the seat tube). One bike I saw achieved a good chainline by using the inner ring of a double chainset up front.

2. Keep the screw-on multi-speed freewheel, and use a single chainring at the front. I guess one selects the sprocket that gives the best chainline, so it may be a lottery to get a useful gear ratio. The one I saw had a super straight chainline. Not bad and a cheap solution. But the 6 speed freewheel is a heavy-ish rotating weight, five other cogs are spinning around unused. Not so elegant!

3. Use a modern cassette hub wheel, shim it up to take a sprocket on the back, with a single chainring up front. This is less dependent on the chainset and BB, as the back end sprocket position may be adjusted with shims.

I've bought my chainset, because it was a total bargain and suited a Shimano UN54 113mm square taper BB that I have in my spares box.  It's a Sturmey Archer single with 44T.  When I fit it I'll measure the chainline first, so that I have a reference to work from. It could be that Option 1 may not be possible. We'll see. I appear to have all the parts needed to try each of the above solutions.

Interesting thing is that standard 130mm rear hubs fit with just a slight hand springing of the rear dropouts. I guess it's only 2mm each side that needs to be sprung! The HLE rear stays are rather more flexible than those on modern frames. I'm guessing the ride will be soft. Anyway, next steps are to service the head set, fit the BB and shine up the frame with car polish...Photos later as I progress.


RECOMMENDED LINK
Velo Solo - A totally brilliant website for riders interested in single speed conversions. The online shop has superb photos, so that you can see exactly what you're ordering. Really worth visiting, even if just for idea-generation.

Thursday, 15 December 2011

How to service a bicycle

I'm about to sort out the Concept Excelsior hybrid bike, which let me gloat again, I bought for only £15 (see my previous post on that). I thought it may be useful to jot down a checklist of things to do. Now, there's no real need to do these all at once. Actually, I see this exercise as a fact finding mission, so as to understand every part of the bike. I then prioritise the areas to service first. In this particular case, I do not want the bike to look pretty, as it's going to be used for commuting and parked in various locations in town. So with that background, here's the full list:
  1. Frame - external: Inspect it all over, look for cracks, dents, corrosion, twists, bends, any defects really. Special care around the fork areas. It may be convenient to do this while washing the bike with a sponge and soapy water. Do ensure that it's rinsed well with clean water though, as most soaps contain salt that encourages corrosion. At worst, you may have to get something welded if steel, or end up chucking the frame because of a previously unseen crack.
  2. Frame - internal: Look inside, where ever possible - down seat tube, look at drain holes in the forks and stays, inside the head tube. When bike is completely dry, spray frame saver inside, or at least Waxoyl. Remove bottle cage bolts to get the spray tube into the down tube.
  3. Saddle and seatpost: Is the saddle tatty, comfortable, or hurty? Loosen the seat post bolt, take the post out. Hopefully, that will be easy, but sometimes it's jammed. In which case, spray some WD40 or Plus Gas around the top of the seat tube, allow to penetrate, then try again. Once out, clean the inside of the seat tube with a rag using a stick as a ram rod. Clean and grease the seat post, bolts and nuts, apply a bit of grease inside the top of the seat tube too, then re-assemble and adjust to the right height and angles. In a year's time, you'll be thankful you did this!
  4. Steering: For a quill stem, do as for the seat post, ensuring especially that you grease the long bolt. I also grease the faces of the stem and the expander wedge where they slide together and very sparingly around the post and in the tube. The idea is that it should not jam later, when you want to remove it, but also, should not slip when you tighten it up. For Aheadset type systems, you need to check that the bolts at both ends of the stem are tight - but rather than stripping them by overtightening, it's probably much better to loosen them all, grease and then tighten up. The bars should turn fully and freely in each direction.
  5. Headset: May well be fine. Stand over the top tube, bend over the handlebars, put the front brake on, and rock back and forth, with your weight on the bars, checking carefully for play in either top or bottom bearing. Turn and feel for roughness. It may be easy and perfectly sufficient to wind the lock rings up a few turns, squeeze some grease into top and bottom bearings and tighten it all up. A more thorough service may be fairly easy - dismantle it, clean, grease and rebuild, and you may have to change the ball bearings or races. It's up to you! At worst, you have to change the headset, which can be a pain if you can't seat the crown race or top and bottom cups easily, but in that event, your LBS should be able to help you out if it needs a full replacement.
  6. Wheels: Loose, or much worse, broken spokes should be sorted out sooner rather than later. Check condition of the rims - how worn are they, how much life is left in them? Never risk running rims that are wearing out - look for wear lines or other indicators. Examine the hubs carefully, especially around the spoke holes. Any cracks or signs of imminent breakage? Are the bearings ok? Waggle the wheels - is there any play in the hub bearings? Again, you may need to strip and rebuild, but a quick tighten up of the axle nuts may be enough for now, the full service not being urgent. Next time you get the tyres off, check the rim tape and the spoke heads too. It may be worth oiling them, to make tension adjustments easier in future. Is it too obvious to say that you must check that the wheels are firmly fixed to the forks?! Track nuts, quick releases, whatever. Grease and lube wherever you see fit!
  7. Tyres: Check for cracks, splits, holes and general wear and tear. Nowadays, I tend to make a washer out of an old inner tube, and put that on the valve before fitting it in the tyre. This stops the edges of the valve hole in the rim cutting into the valve base. But these things can wait until the next time you take the tyres off.
  8. Brakes: Very important area this. Pads must have some decent thickness to them. Old pads can be revived with a file, or just rub the face on a cement floor or brick side. Need to get any bits of metal that may be embedded in them out! Oil everything that has a pivot - including the brake levers. I also oil cable entry points. Adjusting angle of the pads and ensuring that they move uniformly and hit the rims evenly can take time, especially with cantilevers, but it's well worth it. Toe in if you have to eliminate squealing. I use a bit of card at the back of the pad while tightening it up.
  9. Pedals: Ensure they spin freely and aren't mangled up. Angle them and try to dribble some oil in the bearings. Do they suit your shoes!?
  10. Bottom bracket: Grab hold of the crank arms and wobble them, holding the frame still. Do it while riding the bike too, with your feet on the pedals. Examine rings and cups to check they are tight. At best, it'll be fine, especially if it's a cartridge type. If not, either change the cartridge or service the axle and bearings.
  11. Chainset: Clean, inspect the teeth for wear. Are rings bolted on securely? Check the cranks for cracks, especially around the pedal axle area. Are the cranks well secured to the bottom bracket axle? It's worth releasing them, cleaning, and re-fitting them securely. This will stop you cursing later when you want to get them off but can't.
  12. Chain: Clean, inspect, lubricate (see my earlier post for full details).
  13. Front and rear mechs: Clean and oil, ensure they move back and forth smoothly. It's very important to ensure that the L and H settings are adjusted properly, for safety. Otherwise the chain can come off and jam somewhere, causing injury possibly.
  14. Shifters: Clean, and lubricate, but with care! Putting oil in the wrong places on some shifters can cause problems - e.g. slipping. Seek expert help for tricky things like STIs or Ergos. Check condition of cables, replace if necessary, and lube or grease cables at entry points. An easy one is the under bottom bracket cable guide - clean it and oil it.
  15. Freewheel/Cassette: Remove debris, clean up, inspect for wear. Are teeth worn down or fresh looking? Try to lubricate freewheels with a good quality oil - need to exercise some gymnastics to make it dribble around inside to get to the moving parts.
  16. Make notes: I think this is worth doing, and easy as you go over the above items. Frame number, dimensions, gear teeth numbers, all useful information that you may need to refer to later. A few years ago, I started to log my maintenance work in a spreadsheet document on a pc. I've found it more useful than expected - like informing me as to spoke breakages on a particular wheel, and creaking noises - information that gave me clues about other matters that needed to be fixed. 

Sunday, 11 July 2010

Renovating a Raleigh Twenty: Part 4 - Bottom Bracket

I was intending to service the bottom bracket and change the chain today, but was stumped by the fact that the old chain had 93 links. That's possible because of this half link with cranked plates - photo of the old chain above. I don't have a replacement, so had to order one. Anyway...on with the bottom bracket for now.

Above is a photo of the bottom bracket with the retaining ring removed. The cotter pins came out with no difficulties, thankfully, but I'll need new pins when I re-assemble.

Here's the axle cleaned up, with shiny new 1/4" balls, 11 each side. Cups were in reasonable condition and although the axle has bearing wear, it's good to go for a while yet.

I forgot to take a photo of what was inside the bottom bracket shell when I opened it. It was dry, balls were all present, but there were flakes of rust scattered around, mainly over the middle of the axle inside the shell. The photo above is after I'd cleaned it and packed the chainwheel side cup with ball bearings and grease. (The chain wheel side cup is welded in place). Looking inside, you can see that the shell itself is absolutely fine, the steel is in great condition actually. So, the flakes of rust must have fallen through from the seat tube opening - at the top of the cylinder. So, the frame saver that I squirted down the seat tube was needed! I decided to make a sleeve, in the good old fashioned way from a washing up liquid bottle.

Thing is, that nowadays, washing up liquid is not sold in cylindrical bottles any more! So, here's some transparent plastic taken from a bottle of some potion, nabbed from da boss's toiletries collection.

After a bit of snipping with scissors, in goes the sleeve. It butts conveniently against the lip of the chain wheel side cup. The ends overlap at the bottom, in case any water gets in there, it has a way out.

Here you can see the sleeve after being trimmed to size and in position. The outer edge is just inside the thread on the shell.

After screwing in the cup, I gave all the stay tubes a few squirts of frame saver. I've been doing that as I work round the frame, and the only tube that still needs some frame saver is the big chunky down tube.

On eBay, you can buy these cheepo plastic pipettes for pennies. These are great for all sorts of uses round the house, including squirting engine oil into the Sturmey Archer AW hub!

Next time I'll assemble the cottered cranks and fit the new chain. By the way, on close inspection, the chain wheel was not totally straight. Clearly it had been knocked from the side at some point in history. Actually, I had not noticed until now. A couple of whacks with a hammer, and the chain wheel was much straighter! That's the beauty of steel...