Labels

bottom brackets (7) brakes (2) chains (10) Chuck's Tech Opinion (12) clothing (3) cyclocross (23) electronic shifting (2) folding bikes (11) food and drink (1) frames (23) handlebars (1) headsets (9) hybrid (4) kids (1) mudguards (2) pedals (3) racing (21) raleigh twenty project (22) road bikes (21) saddles (3) shimergo (4) single speed conversion project (8) tools (2) transmission (8) wheels (17)
Showing posts with label single speed conversion project. Show all posts

Saturday 26 January 2013

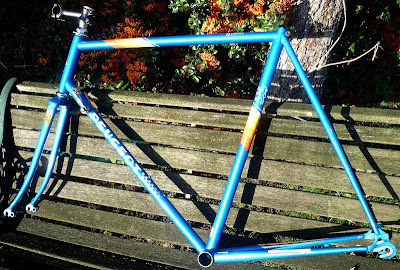
Genesis Equilibrium Build Log Part 3: "Pretty Weirdo"

As a build log, this will be rubbish! I say this because the bike is finished, but I didn't take any pictures along the way. So, I present to you: Pretty Weirdo!
Why that name? If you remember, the build criterion was use whatever stuff I have lying around. Because of that, I ended up with a good looking 6 speed road bike, running cross tyres!
Rear derailleur: Shimano Tourney RD-TX35
Cassette: Shimano 6 speed 14-28T (screw on freewheel type)
Chainset: Mighty 170 alloy cranks 44T steel teeth
Bottom bracket: Neco Shimano compatible square taper cartridge
Chain: KMC with quick link
Front chain-keeper: Deda dog-fang
Shifters: Sunrace 6 speed bar mounted lever
Headset: Ritchey Logic V2
Handlebars: ITM Vitus alloy 46cm (I think this is the o-o measurement, but haven't checked) 
Bar tape: Deda, champagne
Stem: Ritchey Comp 120mm
Brakes: Miche Performance dual-pivot caliper, long drop 57mm
Brake levers: Tektro
Frame: 56cm Genesis Reynolds 725 heat treated chro-moly steel alloy butted (rear dropouts standard road ~130mm), two bottle cage mounts, mudguard eyelets.
Rims: Weinmann AS23X alloy, nutted axles
Hubs: Quando alloy
Tyres: Maxxis Raze 700x33 folding
Basic pedals. Below, grab your steed and jump on! 
Seatpost: Alpina alloy 27.2mm
Saddle: Charge Bucket
Forks: Genesis carbon, alloy steerer 1 1/8", (standard road width ~100mm)

The frame looks beautiful and feels great to ride. Comfortable, yet lively. However, it is too small for me and I can't get over that fact. Therefore, she's on sale now (please see the CTC forum, and later next week, on eBay.co.uk).

Sunday 11 November 2012

Genesis Equilibrium Build Log Part 2: Drivetrain thoughts

In a previous post here, I described some ways of configuring single speed for a road bike conversion. The Equilibrium frame has vertical rear dropouts. These do not allow chain tension adjustment for single speed mode. You need to have some, because a slack chain is dangerous!

A common solution is to use a chain tensioner:

These normally screw into the rear mech boss and use a sprung lever to tension the chain, usually by an jockey wheel or similar, running against the chain. It's even possible to use an old rear mech as a chain tensioner (e.g. by running the chain round the lower jockey wheel only).

However, I don't like these ideas much, as the silent, simple, smooth, single speed feel can't be fully achieved when there's a wheel tensioning the chain.

One option is to forget about single speed, and use a cassette and rear derailleur. It so happens that I have some wheels that are nutted solid axle, the rear having a screw-on freewheel, and I have a suitable 6 speed block. The only thing that bothers me is the possibility that at extreme angles, the chain may drop off the chainwheel. A prevention mechanism for that is to use a chainset with inner and outer chain guards, but that may be hard to find at a reasonable price. Another option there is to fit an old front mech to act as a chainwheel chain keeper.

The concept for this build is to keep it simple, cheap, and that means re-using parts that I already have, so far as possible. It looks like I'm going to have to experiment quite a bit. As I said, this may end up a weird bike!

Wednesday 7 November 2012

Genesis Equilibrium Build Log Part 1: The Frame

Genesis Bikes' Equilibrium frame has earned a great reputation. They struck a happy chord with this one, producing by all accounts a comfortable, rewarding and beautifully finished frameset. I had the good fortune to pick up a new example at a bargain price. My intention is to build it up as a commuter as cheaply as possible. That means using as many of my own bits and bobs that I have lying around. So there's a good chance it will end up a bit weird!
This is nominally a 56cm frame, but the Genesis website specifies seat tube (c-t) 550. It has a relatively short effective top tube of 558, suggesting it will have an upright riding position. Head tube is smallish 150, and the seat post is going to be long, given the sloping geometry of the frame. It's made from Reynolds 725 tubing as shown by the classic seat tube sticker (the description of 725 below is from the Reynolds website):

"HEAT-TREATED CHROME-MOLY STEEL
Using an industry standard alloy with mechanical properties similar to our famous 753 brand, Reynolds mandrel butt and heat-treat this alloy so that thinner walls can be used compared to non-heat-treated steels. 725 can be TIG welded and used within our "Designer Select" combinations including 853 and 631 tubes.
Why it works:
UTS: 1080-1280 MPa, density 7.78gm/cc
Based on a 0.3% carbon steel alloy which has been heat-treated and back-tempered for increased ductility. The chromium content promotes hardenability and resistance to oxidation. The molybdenum works in conjunction with the chrome to stabilize the alloy and maintain strength after heat-treatment and in use."
I believe the forks are carbon with alloy steerer (standard headset required, 1 1/8" size), dropouts and brake bushing. Certainly a magnet does not stick to them as it does to the tubing. DT cable guides already fitted, hmm, but am I going single speed? Mudguard eyes (and a paint scratch):
Neat welding and easy on the eye. Seeing the top tube cable ends - reminds me that I always forget to use frame protector cable grommets. Let's see if I remember this time.
BB shell is standard 68. A very sensibly engineered bridge between the chainstays, should make mudguard fitting much easier:
Quite a lot of dust on the frame - needs a spray of frame saver inside and a good clean outside before I start. Seat tube is 28.6 for front mech (if I'm having one, that is!).  
Below, you can see the straight stays and the geometry. Given the short head tube, I'll probably not cut the steerer, but let's see. 
The rear brake bridge (long drop 57) and seat clamp (29.8). Tseat post is 27.2 diameter - I have one of those in my bits box, but will it be long enough?
Stays are quite thin at the tips and the dropouts seem well made. 
Initially I thought that the kink on the inside of the drive side seat stay (below) was a show room dent, but then I looked closely and it's clear that it is deliberate shaping. Quite obvious that the paint was applied after the shaping. The shop told me that other people had queried it, and they'd already clarified with Genesis that this was a deliberate feature. Presumably it's for chain clearance, but some have commented that it is ugly and unnecessary. 
All in all a lovely frame, and I'm feeling quite excited to build her up, as I said, using what I have "in stock". I will need to buy long reach brake calipers though. After the satisfaction and simplicity of my last single speed build, I'm definitely keen to forget completely about gears... 
Well done Genesis. Can't wait to see your new 953 road racing frame for the Madison-Genesis cycling team, Roger Hammond and Co. He's a cyclocrosser too, so I'll be cheering for them!

Thursday 29 March 2012

Peugeot Single Speed: more photos

I promised more pictures. Here is a rear view. Now sporting bottle cage, and yes, I preferred the green saddle (it's more comfortable actually).
Here is the internal brake cabling. Basically, just a hole in the top tube!
 The front entry hole.  You can just make out the bar end red LED lights. 
In the evening sun by the side of the road. Lovely!
So far, it's been a real improvement to my daily commute.

Sunday 11 March 2012

Peugeot Lautaret Single Speed project - build log

Following on from my earlier update, here is how I built the bike. First of all, I took apart the headset (I've explained in previous posts about the quill-Ahead stem adapter, and funny French sizes):
I want to ditch the ball race cages and use loose balls. With loose balls, the pressure is spread out more within the cups because you can pack more balls in. So, using calipers, I measured the ball diameters:
Definitely 5/32", which is great, because I have some. Reassembled headset with loose balls (this is a view of the bottom cup - the frame is upside down):
Although with a cartridge bottom bracket, a plastic sleeve is not strictly necessary, I cut one out anyway from the Boss's old oregano spice packet:
Trimmed it down to size, making sure that the overlap is at the bottom so that water can drain out through the somewhat massive cable guide hole. Fitted square taper Shimano UN54 113mm cartridge bottom bracket:
Once that was in, I enjoyed some time gleaming up the frame with Simoniz car polish:
Tyres on, wheels on - Tiagra 32h on Omega Mach 1. Fitted the chainset, a Sturmey Archer 44T ally job with steel teeth. This was cheap yet good quality and also had a right side chain guard. Utilitarian, as I intend to use this for commuting. Pedals are MKS resin types for now, again chosen for practical reasons - I could ride this in flip flops - (later I may stick some single-sided SPD touring pedals on):
Using a steel ruler, I measured front chainline, which is from centre of seat tube to plane of chain ring teeth. It was a pretty lengthy 49mm. So, that means the rear cog position would be 16mm from right OLN ((130/2)-49mm). I'm using a Shimino 18T sprocket on a standard cassette type hub to give a gear of around 65 inches. The Velo Solo shims are great, because you can use different thicknesses to set the rear chainline. This is how I measured the rear cog position using two rulers:
After doing that, I did a secondary check on the chainline with a long steel ruler:
Much to my surprise, it was spot on, so the calculation had worked! Then I put the handlebars on. The front brake was a cheepo steel side pull unit off eBay. Rear was an alloy side pull unit (from my box of old unused bits). I also needed some bolt spare parts, again sourced cheaply from eBay. I fitted the brake levers in a position that suited braking from the hoods, as that is mostly how I will ride this bike. I don't want flat bars because I like the greater number of hand positions of drop bars. Fitted the cables, the only interesting thing here is that the rear cable runs into the top tube. I used a hook to pull top tube cable out of interior cable run. You can just about see the rear cable entering the top tube in the photo below [I'll need to get a better photo of that]:
I hooked up a SRAM 8sp chain, estimating length by running it around with the wheel in a forward position in the dropouts, taking account of the length of the Powerlink joining link. I decided to keep the rear hub QR skewer, because when I lock the bike I always run it through the back wheel:
On the front, I fitted a bolted skewer from Halo. Fitted saddle - I'm still umming and ahing over black or green (Charge Bucket, which is a cheepo one that looks a bit like a Turbo). Steel chromed 22.2 seat post. Handlebar wrap with Trek red light bar end plugs - once again, a practical thing for late evening commuting.
The only hitch along the way, was a problem with the seat post slipping (it went down about 1cm during a 1h ride). As a temporary solution, I did the "good old coke can shim thing". First, drink some coke, then rinsed the can and cut it:
Trimmed to fit and inserted inside the existing seat tube shim. Shoved the post in, taking care not to let the shim slide in fully. I did that by cutting slits in the top of the foil, to make tabs that I hooked over the edge of the shim. After tightening the bolt, I then unfolded the tabs:
So that I could trim off the excess carefully with a serrated knife:
Lovely jubbly! So far, the temporary solution has worked well. I've ordered a slightly thicker seat tube shim anyway, but hopefully, I'll never have to use it. I'm guessing that the original seat post would have been around 24.2mm. What a weird size. Let's see how it goes. To continue with the practical theme, I will probably fit some mudguards, but will keep them low profile!

Hope you enjoyed this build - click on single speed conversion project on the right for all the posts on it. It's very satisfying to get an old frame running again. It feels light and comfy and has cheered up my commute a great deal. So far I've got up to about 44km/h on it and at that speed it seemed sure footed enough, although not rock solid like a modern bike. I've surprised myself at the versatility of the 65 inch gear is - I've ground up some decent grades with it now. But most of all, I'm impressed by how efficient and quiet it is to pedal. So silent, that on one ride I was bothered by the noise of a crease in my jersey fluttering in the wind! Never thought that would ever happen!

Friday 9 March 2012

Peugeot Lautaret single speed project

She's on the road, posing on the verge! These photos were taken on her maiden voyage. The roads were wet, but there was late evening sun. More later, including build details.


She feels light and lively. Just like any lightweight steel frame actually. But the thing that struck me most was the quietness while pedalling. As your legs turn the cranks there's no noise as the chain does its thing. 

Monday 27 February 2012

Update on Peugeot Lautaret Project

I've decided to build up the Peugeot Lautaret as a single speed. No dangly mechs or levers! Opting for freewheel, not fixed. Here's a photo:
I sprayed frame saver inside the tubing. The HLE tubing material is interesting (those d/t levers will be coming off btw):

It's Peugeot own brand "Haute Limite Elastique". A USA 1987 Peugeot brochure that I found online describes it as follows:

"HLE Tubing: HLE is Peugeot's exclusive alloy tubing. It is a "micro alloyed steel" which is comprised of Manganese, Niobium, Aluminum, Carbon and Titatium[sic], which offers a lighter, yet stronger frame. These elements are commonly used in the production of aeronautical steel. The introduction of these elements results in a steel with dramatically improved mechanical properties when compared with more conventional steel. The strength to weight ratio of HLE tubing is far superior to that of conventoinal tubing. Using this tubing enables Peugeot to save more than 7 ounces in the weight of the frame. The HLE tubing, when used with our patented internal brazing system, gives Peugeot a frame which is at the top of its class in performance and reliability."

SEAT TUBE
As best as I could measure it, the seat tube inner diameter was 24.0mm. An odd size, and I could find no post to fit. So, I obtained a shim with 1.8mm thickness, to narrow the internal diameter to 22.2, the rationale being that this is a more common size for seat posts. Here are some photos (the shim is a black, USE brand):
Since the shim was for a larger diameter, I had to trim it along one edge and squeeze it in:
I have a cheepo 22.2 steel seat pin, and it fits beautifully. I may try to find an alloy one. The seat post clamp is a traditional steel nut and bolt type, which is less likely to damage a steel one when tightened.

STEM
I have a solution for the steering end. I sold the quill stem that came with the frame because modern handlebars didn't fit the clamp. It went on fleabay for £5.99. Since I bought the whole package originally for £13.10, that means the frame cost me £7.11! I got hold of a 11/8-22.2 quill-Ahead adapter. Luckily the adapter tube fitted perfectly inside the steerer, but the expander wedge was a bit too wide (probably 22.2). As the wedge was alloy, I was able to reduce it to fit using AlOx paper. The stem is a modern type from M:part, with a 25.4 clamp, perfect for the handlebars.


SINGLE SPEED CONVERSION OPTIONS 
Here is a summary of what I've been mulling over. Over the last few weeks, it was useful that I spotted some 1980s racing bikes parked in public places that had been converted to s/s. I've seen three different approaches:

1. Replace the multi-speed freewheel with a single speed freewheel, simply screwed on to an old style threaded wheel hub. Predictably, with a single chainset, the chainline is rather angled. It was not a very good solution for one of the bikes I saw. It could be made to work if the freewheel was shimmed out a bit, and at the front, one could use a shorter BB axle length and a different chainring that fits to yield a shorter chainline (that is, closer to the seat tube). One bike I saw achieved a good chainline by using the inner ring of a double chainset up front.

2. Keep the screw-on multi-speed freewheel, and use a single chainring at the front. I guess one selects the sprocket that gives the best chainline, so it may be a lottery to get a useful gear ratio. The one I saw had a super straight chainline. Not bad and a cheap solution. But the 6 speed freewheel is a heavy-ish rotating weight, five other cogs are spinning around unused. Not so elegant!

3. Use a modern cassette hub wheel, shim it up to take a sprocket on the back, with a single chainring up front. This is less dependent on the chainset and BB, as the back end sprocket position may be adjusted with shims.

I've bought my chainset, because it was a total bargain and suited a Shimano UN54 113mm square taper BB that I have in my spares box.  It's a Sturmey Archer single with 44T.  When I fit it I'll measure the chainline first, so that I have a reference to work from. It could be that Option 1 may not be possible. We'll see. I appear to have all the parts needed to try each of the above solutions.

Interesting thing is that standard 130mm rear hubs fit with just a slight hand springing of the rear dropouts. I guess it's only 2mm each side that needs to be sprung! The HLE rear stays are rather more flexible than those on modern frames. I'm guessing the ride will be soft. Anyway, next steps are to service the head set, fit the BB and shine up the frame with car polish...Photos later as I progress.


RECOMMENDED LINK
Velo Solo - A totally brilliant website for riders interested in single speed conversions. The online shop has superb photos, so that you can see exactly what you're ordering. Really worth visiting, even if just for idea-generation.

Sunday 11 December 2011

Peugeot Lautaret and Hybrid commuter projects

Found a couple of bargains on eBay. Here is a lovely Peugeot Lautaret frame (£13.10):

After studying it carefully, I'm pretty sure it's from 1987, as this is the date stamped on the Sachs Huret down tube shifters, and according to brochures online, the rainbow paint scheme is from that era. It's marked 12 vitesses, and the tubing is Peugeot own brand HLE, neatly internally brazed (no lugs). Paint is in great condition. The BB seems to be English 68mm, the seat tube is weird size, probably a 24mm diameter, and the stem is a 22.0 French jobbie. Rear dropout spacing was 120mm, but it was pretty clear that someone had cold set it unevenly. By sighting down the seatstays, one could see that the right hand stay had been pushed in. I gently pulled it back to its original 126mm spacing. Now to figure out how to build it up - single speed or 6 speed? I'm certainly going for a single chainwheel up front. Options, options...

Second bargain is a Concept Excelsior 15 speed hybridy mtb type thing (£15):

Judging by the condition of the chainset, sprocket teeth, tyres, rims and brake pads, it's HARDLY EVER been ridden! A label on it says "Designed in England by Concept Cycling Ltd" and another "Mega Carbon Steel". The frame feels bomb proof. I know nothing of Concept Cycling Ltd, but a quick Google search tells me that it went bust in around 2005 and is now part of the Avocet Group, with Viking and other brands. The chain was rusted and wrapped round the 5 speed block. But it was simple to unwind it, lube it and in 10 minutes, it was back in rideable shape. It rides fairly well actually. Front twist grip changer is knackered completely. I adjusted the L set screw on the front mech to put the chain in the middle ring (38T) for now. Rear twist grip shifter is ropey, but seems to work in a fashion. There's a straight chainline with the middle ring at the front and the second smallest sprocket at the back (17T), which is ~58". I'm wondering whether to lose the rear mech completely, fit mudguards and make this a single speed commuting hack using existing cogs and rings (it has sloping dropouts). But I'll need a longer seatpost first. At least it's a standard ish size: 25.4mm.

Will post more photos as I sort these out. But first, allow me to revel in getting a frame and a functioning bike for a grand total of ~£28. I feel smug! Marvellous. Thanks eBay!