Showing posts with label cyclocross. Show all posts

Saturday 16 August 2014

The best way to seal Cyclocross Tyres? SeamSure v SeamGrip v Copydex

I may have finally found the best way to seal quality CX tyres like Challenge open tubular (clinchers). In a previous post, I compared Copydex glue with SeamGrip. Both work, but Copydex peels after a while and the SeamGrip is really gloopy and messy to apply. Water based SeamSure is way easier to apply:
It's a milky solution that is dead easy to brush on to the sidewalls of the tyres. Another easy way is to smear it on with gloved finger. A bonus is that you can wash up with warm water and soap. It actually comes in a bottle with an integrated brush, but I didn't bother with that, and instead used a better quality half inch wide paintbrush.

According to the package literature:
"Seam Sure is a fast drying water based urethane formula designed for sealing sewn seams on synthetic fabrics and breathable laminates. Seam Sure dries to a clear, flexible, long lasting film with a nearly invisible, non-gloss finish. Seam Sure is washable, dry-cleanable and freeze/thaw stable". 
Now doesn't that sound perfect for CX tyres?
Amazingly easy to apply and it does indeed dry almost invisible, with a matt finish. The only question then is how will it survive the cyclocross season? I will find out over the next months and let you know.

Sunday 19 January 2014

Challenge Tyres: sealing side walls Seamgrip v. Copydex

These Challenge Grifo are beautiful clinchers. Note that Challenge call them Open Tubulars meaning they're made like their tubulars before fitting a clincher style bead. Extremely high TPI, so very supple. Since they're made of cotton, it is advisable to seal the tyre walls. I've done an experiment here, top one is sealed in Pritt Copydex (latex base solvent free glue). It had nil effect to the feel of the tyre. 
The one below is sealed with McNett Seamgrip, a tent and camping equipment sealant. Of the two, I found that Copydex is much less messy to apply, but no where near as robust as the Seamgrip. In the photo above, you can see the edges peeling. However, after a number of cross races, the Copydex had not come off. So, it's worth doing, even though the Seamgrip is better. The Seamgripped carcass was perhaps a tad less flexible, but the main drawback was it's gloopy consistency and difficulty in application. Ideally, if the Seamgrip could be diluted down a bit before application it may be easier, but I fear that can only be done with pretty nasty benzene based solvents. If anyone knows of a harmless solvent for Seamgrip, please do comment below!

Sunday 12 January 2014

British Cyclocross Championships 2014, Derby

The best of UK cyclocross talent were at Moorways Leisure centre today. Here are some photos from the elite mens race. The pit is always a busy place:
Power washers at work. I wonder what's in the yellow wheelie bin...

 Ian Bibby getting down. Now that's not a Genesis bike, is it? It be a Ridley.

Salsa in the mud. Look at those feet go! 

Balletic movement by Ian Field. Total concentration he was, all day, on the way to what I think is a threepeat national title. 

Mucky sticky mud everywhere, causing errors. But he was probably thinking "this is not as nasty as Namur!"

Take a look at Ian Field's Focus (yes, that's a Specialized, but I was referring to his eyes, not the bike brand!).

 He made it look so easy... He dealt with the pressure really well. It's tough at the top!!

 Nick Craig, proper punchy power.

 I love this picture. This is what Cyclocross is about!

 Hargroves lead out on to the "dancefloor".

 Stu Bowers getting shouted at:

Vicious Velo, looking well vicious. 

Yep, an interesting day out (remember to take a spare pair of shoes though!)  Plus there was the womens event (won by Helen Wyman, her 8th title), Juniors and U23 (which we missed). All this for the price of a small donation to the local Scout organisation - you've gotta go watch some cyclocross. 

Monday 21 January 2013

Snow!

Time to have some fun on the cyclocross bike. There's nothing like it! The tyres are Challenge Grifo  700x33 clinchers (what they call "open tubulars", but they are not tubulars!). 

Saturday 12 January 2013

How to change brake pads: Clarks V inserts, Tektro CR720 cantilevers (cartridge)

In muddy, wet conditions, brake pads wear out very fast. Replacing cartridge type pads is quick and somehow satisfying. I'm a fan of Clarks brake stuff, because quite simply, I've never been disappointed after buying any of their products. I also like Kool Stop, but they are pricier. So, step one, dismantle your brake assemblies, and clean up the alloy holders (soapy water and an old toothbrush - rinse well in clean water, and dry off with a paper towel). 
These CP501 70mm insert cartridge pads are very cheap (less than £4 a pair), but in my experience, feel good and work well. They would fit V, Hybrid, Touring, MTB - basically Shimano pattern cartridge holders. The pads come with new retaining pins (you can see them taped to the cardboard pack above). Below, you can see the "forward" arrow markings on both pad and holder, and the cutout for the pin on the pad.
Simply slide them in, but at the point shown in the photo below, remember to put the bolt back in position before fully pushing the pads home. I hold the pads with my fingers and press the holder down on a flat surface. 

Here the pad is pushed home (you should be able to see daylight through the little hole). Then simply push the retaining pins in. 
Put the bits and bobs back on the bolt in the original order, finishing with the washer and nut. Below they are all ready to be fitted back on the bike.  
I have to say that I find the Clarks pads to be an improvement on the Tektro pads that came with the original brakes. The great thing about cartridge type brake pads is that you can try out a few different brands and types - e.g. dual or triple compound varieties - in order to find the ones that you most prefer. There's a huge choice out there, and a wide spectrum of prices!

Sunday 9 December 2012

Round 10 Wessex CX League - NHRC at War Memorial Park, Basingstoke

North Hampshire Road Club created a superb course for Round 10, which was also the South of England cyclocross championships. The start of the JVW race was given a staggered treatment. Juniors off first, then V40-49, V50+ and W, each group starting a few seconds after the previous one. Here, the finish line and timekeeping tent.

When the seniors came by, Steve James and Adrian Lansley (who eventually finished 1st and 2nd) made this off camber section look really easy. It was NOT for the less skilled riders - like me!
They simply flew round it, whereas others would go round gingerly, or take less efficient lines.
There was a bank on the far side, which you had to build a lot of speed in the run up in order to climb it. Many riders came a cropper on it, normally near the top, as their speed ran out, and then they, slipped down because it was steep. The corner below was a lot of fun!
Part of the course went through a BMX track, which was totally fantastic. Also a grindy bit through mud and leaves in the woods, with a bit of a drag, and the obligatory banana skin tree roots. Even the hurdles were placed "thoughtfully" - after a slightly uphill left hander, then over the hurdles into a running right hander, not easy to remount unless you run on a bit. Yep, it was proper cyclocross today!

Monday 5 November 2012

Round 8 Wessex CX League - Oxonian at Harcourt Hill, Oxford Brookes

On Saturday it rained cats and dogs. On Sunday, the cyclocross frogs came out to play. The amphibians frolicked on a very wet course - and it was cold too. These photos were taken early in the day. The avenue in the woods (below) may look dry underfoot, but I assure you it was not! It soon transformed into a muddy brook. Seriously, the water was flowing (towards you in the photo below). Pedalling through the woods, was more like paddling up and down stream. A very unusual sensation.
The path below was waterlogged too, and quickly cut up into a boggy slush. I wish I had taken "after" photographs to demonstrate what I mean about the "rivers" through the woods. That sign should have read, "Care! Deep water and strong currents!" 
Here are the youngsters hard at it. The hooded spectators are riders perusing the course prior to their race. Everyone is wondering why they didn't stay tucked up under the duvet this morning...
Of course, the sun started to (threaten to) show itself just as the race was ending. Here's the chicaney bit leading into the finishing straight. A nice design feature that made for a few excellent sprint finishes. 
Below is the finish line and time-keeper's gazebo. All in all, a well thought out circuit. Other features included two open earth sections that you had to ride rather like sand. Tyres clagged up quickly, but the mud shed fast afterwards. One of these "flower bed" sections came just after a double barrier. And then of course, was the infamous ditch that marks the entrance to the flooded wooded section. You get to the ditch via a narrow opening in a hedge. The ditch itself was full of cold muddy water and a decent leap was required to cross it. There were also a few bobbly bumps, ramps and such, that may well have caught out an unwary rider. 
But the most significant feature today was the waterlogged ground. Heavy going and grunt work. Luvvly Jubbly!

Monday 29 October 2012

Round 7 Wessex CX League - Swindon at Rutherford Appleton Lab, Didcot

What a place! In amongst the egg heads' radio telescopes and laboratories, lies a stony, chalky hill. Someone with a sense of humour thought it would be entertaining to build a cyclocross course around it, like a helter-skelter, roller-coaster theme park kind of affair. It was so entertaining, that I didn't even notice this digger until after the race: 
The chalky hill was just rideable and hard work. I wish I'd taken photos from the summit of the hill, and in particular, down a chalky side towards a fence that goes alongside a right hander on a grassy ledge. Quite spectacular. One could imagine how an overcooked descent could slam the rider into the fence at best, or send them over it, like when those crazy Tour de France riders sometimes misjudge an alpine corner. And I wish I'd taken a picture looking down THE steep muddy bank, where there were spills and thrills aplenty, but alas, I didn't get the chance. 

Many punctured on this course. Some considered it not a "real" cyclocross course, but more like a mountain bike circuit. Well, it had a few hundred yards on flat concrete, quite a lot on grass, plenty of banks and off-camber sections, some of which forced a dismount. And it was hard work, windy and cold. Sounds like cyclocross to me! And cyclocross has always been cool:

Now that's what I'm talking about!

And, before I forget, a huge round of applause for the brand-spanking-new-looking changing rooms and shower block. Never has a hot shower felt so good!

Round 6 Wessex CX League - Reading CC at Prospect Park

Rain over the last few days created luxurious mud baths around the course. The section in the woods was surprisingly dry, but there were a couple of peaty mud corners that were tricky to negotiate. A couple of the ubiquitous Cotswold Veldrijden warming up:

Seriously, the blues are everywhere. Lovely kit though, I've got to admit. 
This part of the course had puddles - you can just about see them below. Who knows whether a tree root lurks under the surface, just like the Loch Ness Monster...

This is what I call a determined youngster, no fear going straight into the mud.
The steep uphill banks were muddy, which made a challenging course all the more demanding. Altogether, a superbly organised event in tricky conditions.

Monday 15 October 2012

Round 5 Wessex CX League - GWR Team Swindon at Supermarine RFC

A sunny autumn day at Supermarine rugby club, founded in 1958 by the workers at Vickers/Armstrong. In the background, you can just about see the archery targets of the Supermarine Bowmen, who were out training this lovely, but chilly, Sunday:
Once again, an entertaining course. On each lap, many things came in pairs. There were two twisty grassy sections. Two flattish stretches across the playing fields each swooping into a right hander. Two barriers far enough apart that it was better to ground the bike and roll it between the hurdles. Two wooded sections. Each wooded section had a brief excursion out of the woods before shortly diving back into the trees.

It had rained heavily in the week, so some of the course was muddy. I have no pictures of the muddy sections, but it was the kind that sticks like clay in shoe tread and doesn't allow you to clip in to the pedal. The mud was worst coming out of the second wooded section. Interesting study in mud here. To exit the woods you had to cross a bank, which required a dismount and running up and down the other side. The bank had sticky clay type material on both slopes. Immediately after that was a twisty section through peaty, loamy stuff. On some of these turns by the end of the race, running may have been faster than riding. So, different kinds of mud just a few yards apart.   

A twisty grassy section at the end of the lap had some slight off camber bends, which did catch out a few riders (not me thankfully). Here's an intrepid junior negotiating it nicely:
The only downside today was that from the start, a wide stretch of grass, to the first wooded section in single track, there was a drastic funneling effect. This created a huge traffic jam, like a hopper jamming. Ho hum, you can only play the cards you're dealt. At least there weren't any major crashes. 

Monday 8 October 2012

Round 4 Wessex CX league - Sotonia CC at Fleming Park

It was one of those lovely autumn days, when golden sunshine backlights the trees (when it was not overcast, anyway). Evil course designers had laid switchbacks going uphill and downhill. The sequence was: medium uphill drag, long descent, long hard uphill drag, short descent, short uphill drag, to a sandpit! Fine for all those wiry, squirrely, hobbity types, but not for those who, like me, have been blessed with carrying a few extra, ahem, "panniers".

No pictures this time, but a great video from Julian Gee here:
This being an old golf course, the sandpit was a bunker, complete with trip-worthy lips at each end. Quite a few tumbles there as riders' front wheels dug in either on entry or exit. I rode it a couple of times, got bogged in once, but mostly found it safer to run it. There was one great section which went downhill into a right hander up a short bank, a left hander down a small ramp, then an off camber left hand up slope section, diving down a bank into a right hander. My main memory of this was ducking under the birch tree branches on the dive exit. It was great! On the first lap, it was on this sequence where in all the traffic I came unstuck and lost a number of places. On the last lap, the lines and curves were dialed in and with no other riders nearby, I flew round it, but I guess so did everyone else by then.

Quite a few small ramps and banks on the course, which required getting speed, gears and lines sorted out - I suppose that's the definition of "technical section". In addition, most downhill bits required the brain to stay engaged, because they were snakey, or down a ramp into a tight corner, or entering an off camber bend!

It was certainly not boring. I understand it was their first event here, so big congratulations to Sotonia CC, the helpers, and the course organisers.

Wednesday 26 September 2012

How to remove grass from Velcro

One of the frustrations of cycling on freshly cut grass is the mess the clippings make. Drivetrain and shoes get completely clogged up, especially when it's wet. A huge hassle to clean up later. Even after washing it off shoes, it remains ingrained, stuck in the hooky parts of Velcro straps. To see what I mean, look at the shoe on the left below:
A nice way to remove this grass and vegetation is to brush it out with another piece of Velcro. Use the hooky side of another piece. You can see this "brush" in the photo above: it's the white Velcro sticky dot between the shoes. It works really well, the hooks get right in there, and doesn't really damage the strap as long as you're gentle. The grass on the strap on the right hand shoe has been cleaned using this method, the one on the left is still to be done.

A useful tip I hope.

Monday 24 September 2012

Round 2 Wessex Cyclocross League - Swindon at Lydiard Park

Driving along the motorway, the rain was continuous, road spray kicking up, spoiling the view. On the course, it was brollies and wellies - I had neither :(. The signing-on tent seemed like the best place to be!
As the rain poured, the wet course got wetter. Even corners on the grass became slippery. The track in the woods quickly became a mud skating rink, littered with banana skin tree roots! The slimy mud ramps and banks were lethal. Having learned my lesson the hard way, I decided that the safest way up them was on foot!

The grass had been cut recently and clippings compressed into the drive train, clogging up shoe cleats. Quite a few riders had to stop with mechanicals. Personally, my drive train survived, but occasionally my rear gear slipped, probably because of all the organic matter clagged to it. With so much stuff going on to "maintain one's interest", the bell came quickly. Yes, I was relieved to hear that sound. Both pedals jammed by sticky mud and shoes clogged with grass, clipping in was challenging sometimes, especially after the barriers on the last lap.

One of the race organisers afterwards was telling me that riders had broken mechs, and he seemed to think they were mostly Campagnolo 10 (and 11?) speed. I was happy to be running the wider chain and perhaps more rugged Shimano 9 speed.
What a mess to clean up! Body, bikes, shoes, clothes, car....miserable. But somehow, glad to be one of those nutters riding around a wet field in the cold and rain.

Wednesday 19 September 2012

Tyre Fitting: Tread Direction for off road MTB and cyclocross

Which way round should tyres be mounted for off road use and cyclocross racing? I'm fully aware that some manufacturers have rotation arrows on sidewalls and information on websites and in brochures. However, manufacturer's instructions are inconsistent on the subject, as I'll demonstrate below. And then I'll give my views on the answer!

WHAT DO MANUFACTURERS SAY ABOUT ROTATION DIRECTION?

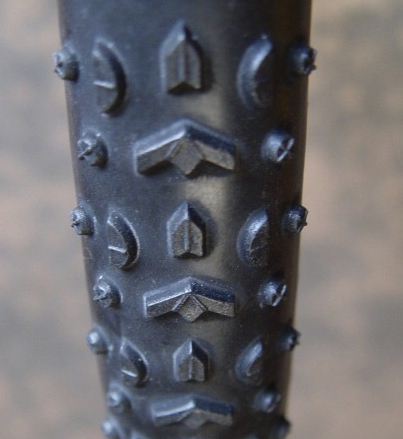
Off road tyres often have a directional tread. Here is a photo of Michelin Mud2.

The knobs form roughly a V shaped chevron or arrow pointing upwards in the photo above. They are marked on their sidewalls with rotation arrows reading "front" and "rear." Michelin's website says:

"Why a particular direction for fitting?
The direction in which a tyre is fitted will enable the user to optimize the performance of the tyres in terms of braking and traction.
In general, the front tyre is more involved in braking while the rear tyre gives maximum traction.
The rolling direction is marked directly on the tyre by an arrow.
The tyres are also marked “Front” and “Rear”."

Is Chuck satisfied with that? No way! In contrast, this is what the Clement tyres website says:

"Q: Which direction should I install the PDX cyclocross tires?
A: We prefer to install the PDX (and most tires) so the arrow-shaped knobs in the center of the tire face forward when viewed from the top. This is true for both front and rear tires. Some riders may install them differently to get different traction characteristics and that’s perfectly OK!"

The arrows on the side of the Vittoria XG Pro (below) are marked "speed" and "traction".


 The Vittoria website says: 

"Is there a mounting direction for my tire?
Mounting direction is shown by a little arrow engraved onto tire sidewall. In the case it is not visible for any reason, do follow the tread pattern design: if it design an arrow, that has to run forward, otherwiese if the tread pattern itself is specular the tire can be mounted either way."

The Vittoria XG Pro have a similar tread pattern to the Challenge Grifos below:

This is what the Challenge website has to say about it:

"The GRIFO is a very special tread pattern which can be used in both directions!
If you point the arrow < < < of the tread forward the tire is faster having low rolling resistance. 
If you turn the tire around with the arrow pointing backwards > > > the tire has much more grip. In this case it is not as fast because there is an increase in rolling resistance. 
It really depends on the type of course you have. So you can actually find your perfect setup according to the course and your style if riding.
The front tire in most cases is kept with the arrow forward, but in a few occasions can also perform better the other way.. 
The rear tire is usually more suitable to switch directions.
 
Have fun trying !"

MANUFACTURERS ARE INCONSISTENT!

So, summing up the above, Challenge and Michelin seem to be saying that this is usually better (viewed from above):

<<<<<< front <<<<<<< ==========BB========>>>>>>>>  rear  >>>>>>>

Whereas Clement and Vittoria seem to be saying that this is usually better (again, viewed from above):

<<<<<< front <<<<<<< ==========BB========<<<<<<<  rear  <<<<<<<

Faced with this, the thorny issue here is about the orientation of the rear tyre tread. I say there's no issue with the front tyre, because every elite MTB or cyclocross bike I've seen has had the front tyre oriented so that looking from above, the chevron/arrow in the tread points forwards and this has always been consistent with the manufacturers recommendations that I've seen.

WHICH WAY IS BETTER?

As to the rear tyre, I've looked at hundreds of photos of elite riders' MTB and Cyclocross bikes on t'net. This includes a number of ex world champions and national champions (eg Stybar, Wyman, Field, Nys). I found the following:

Out of nearly two dozen bikes of elite riders, only one had the rear tyre oriented so that the chevron/arrow points backwards when viewed from the above. The one exception was Tim Johnson's MTB bike (he's more known for CX) on which he had the rear tyre (a Schwalbe Rocket Ron) the other way, with arrow pointing back when viewed from above. The vast majority of bikes had the Vs pointing forwards on both tyres when viewed from above. This included some fitted with Michelin Mud2s, which as I explained  have arrows on them indicating that the rear and front should point in opposite directions. In other words, the riders do not follow the manufacturer's arrows!

I would rate the empirical evidence and practices of world and national CX and MTB champions very highly - presumably they've done enough qualitative testing and timing to form a considered view. 

I run Michelin Mud2 on my CX bike and I've tried them in both configurations. To me the one with the V on each tyre pointing forwards (as viewed from above) works best. Why should this be? Well it could be a placebo effect - that I'm gaining some positive vibes by simply doing what the pros do! 

On the other hand, perhaps there is another reason. Going downhill across a slope, making an off-camber turn, is one of the more risky manoeuvres in cyclocross. The bike can wash out sideways very quickly on a greasy surface. Let's examine that situation a bit more. One is rarely driving the rear wheel hard and may even be braking a bit, front and rear. The diagram below shows the angle of the chevrons as they contact the ground. The green arrows indicate the direction of the slope. In each example A and B, the tyre is rolling from right to left. In other words, not straight downhill, but slightly across the slope. The red oval shows the contact patch schematically. I've put it on the uphill side, because that is the part of the tyre that contacts the ground in this situation. You could imagine the grey chevrons as tyre prints in the mud. Think of the arms of each chevron on the tyre as little skis! In example A, the tyre is mounted with the Vs pointing backwards as the bike is viewed from above. You can see that the uphill arm of the chevron - in the contact patch - is almost parallel with the slope. It is likely to slip easily just like a ski pointing downhill. In example B, the tyre is mounted in the conventional way for a front wheel - that is, Vs pointing forward when looking at the bike from above. In the contact patch, the arms of the uphill edge of the chevron are roughly perpendicular to the slope. The skis are cross-slope in like a skier digging in edges on a side slope. If you're not convinced about the ski analogy, remember that the rider may be braking. There seems to be a clear advantage of B over A, at least going downhill.

Uphill, you can use the same diagram as above but imagine the tyre rolling from left to right. A has tyres mounted with the Vs pointing forward as seen from above. However, uphill, you will be travelling slower and probably not braking. B seems better than A. I guess that's what makes a good tyre tread design - functioning well in both directions. Remember, the diagram above is very simplified - for one thing, it does not show the edge tread, or the diamonds filling out the chevron in the middle as in the Grifo and Vittoria XG Pro, both of which are bound to affect performance. 
.
CONCLUSION

So, having tyres fitted like Vittoria and Clement seem to prefer (Vs pointing forwards front and rear when viewed from above) appears more sure-footed for off-camber downhill tracks and cross-slope descents. It seems to be the more popular approach for pro riders. It's also supposed to be the faster orientation according to the tyre manufacturers. However, reversing the rear tyre could be worth a try e.g. where there are significant stretches of slippery off-camber uphill on the course.