Showing posts with label cyclocross. Show all posts

Tuesday 18 September 2012

Round 1 Wessex Cyclocross League - Oxonian at Oxford Spires Academy

Slight diversion now, as I'll be blogging about the Wessex CX League events. Round 1 took place last Saturday 15 September 2012, at Oxford Spires Academy. The course was built around playing fields on two levels. Massive queue at sign on, and the blue of Cotswold Veldrijden abounded:


The Junior/Veteran/Women's event was recalled after about 3 minutes of racing, causing the pack to emit a collective groan. The false "start" was because the leaders went the wrong way around the circuit. I daresay that better communication from the commissaires could have prevented that. 

By all accounts, there were three incident packed locations:

1. A rideable grassy bank climb going up from the pit area to the higher level playing field (shown in the distance below):


On the climb, for example, riders falling or dismounting very close to the top, meant either carnage, or an overtaking chance for those following (round about where the flag is below):


2. A fallen tree in the woods with a ramp ~10m ahead of it. The log was jauntily placed diagonally across the path. With no competitors around, you could cross the barrier, remount and ride the ramp, provided you were in the right gear. However, with other riders about, it meant carnage, or a waiting manoeuvre for those following. There was no space to get past easily on the single track. Many people were dismounting, crossing the log, and pushing/carrying the bike up the ramp before remounting. I was forced to hug a tree to prevent a mishap. Some people were smiling when they emerged from the woods: 


3. A couple of steep, grassy, off camber, downhill banks, sloping towards a chain link fence around tennis courts (sadly, I have no photos of this). Thankfully, the ground was dry, but it was also very bumpy. I dunno how my teeth didn't fall out, and I didn't fall off! Many stories of splats against the chain link fence, and even some over the bars carnage. It seemed a way to do it was to pick your line from the top and pray, and don't try to change your line half way down. Mishaps meant (you guessed it) carnage, or a "flash of life before the eyes," for those following. 

Much time spent chewing the bars was alleviated (a little) by the magnificent weather. Sunshine and not much wind. 


Note how riders can leave the ground going UP this ramp - I've heard stories of folks landing in a heap after this kind of leap, so keeping in contact with the ground may be safer. 

Not bad photos for a mobile phone, if I do say so myself!

Monday 14 May 2012

Quick Release lever alignment

Michael Barry, the Team Sky professional rider, recently wrote about his favourite cycling innovation, the humble quick release lever (article here). The other day, I looked idly at bikes in a public rack. I noticed that people position the closed lever in many different orientations. Which way should QR levers point? A good subject for a "Chuck's Tech Opinion," I mused.
Sounds like a trivial matter? No way, I say! A good friend of mine had a minor crash on his beautiful all carbon bike. The front fork was gouged by the QR lever - a very expensive mishap. The lever had been locked in front of the fork blade, pointing up. I've also heard stories about a person who pulled a bike out of the rack, and only when riding discovered that the QR lever had been snagged open!

When you examine pro bikes, it's very interesting, as it seems that rear lever alignment is team, or should I say team mechanic, dependent. So, for example, TT bikes from Radioshack/Leopard Trek (including Cancellara), Vacansoleil (including Larsson), Saxo Bank (including Boaro), Astana (including Brajikovic) have the QR lever on the rear wheel pointing backwards, as in the photo above. The others have the QR lever positioned under the chainstay pointing forwards (e.g. Team Sky), or back and up, or in the crook between chainstay and seatstay like this:
"In the crook" also appears to be the way most pro cyclocross riders orient the rear wheel QR lever. I guess that is because the risk of snagging the lever (e.g. by a passing bush!) is lower in this position (it's tucked into the stays, which protect it a little). Another thing the pros have to worry about (but I don't!) is ease of access for wheel changes.

When it comes to the front QR lever, it's much simpler. Among the pros, as far as I can tell, it is always pointing backwards. Either under the fork, or backwards and upwards. The other pro thing is that the lever on the front wheel tends to be on the left side of the bike (on the rear wheel it HAS to be on the left side).

So, fwiw, here's my opinion. On the rear wheel of CX bikes and commuters that are often parked in racks with other bikes - where there is a risk of snagging the lever - I will orient it tucked into the crook of the seatstay and chainstay. Whereas for TT, I may have it pointing backwards. It really depends on the frame structure around the dropouts and the shape and configuration of the QR lever. I am not that keen on pointing it forwards and down under the chainstay - but I would do that if there is no other way (it depends on the configuration of the lever and type of frame - sometimes it won't go into the crook without fouling the frame, for example). On the front wheel, it's always pointing back, either under the fork or backwards and upwards behind the fork blade. Usually this is achieved with the skewers oriented so that each QR lever is on the left side of the bike.

And yes, I agree with Mr Barry that the quick release is a great bicycle innovation.

Wednesday 29 February 2012

Cyclocross wheels from Hewitt

A year on, the folding bike wheels that Hewitt built up for me are still going strong. They are in daily use, straight as they were the day they arrived, with no loose or broken spokes. Filled with that confidence, I decided to get my primary CX racing wheels made by them too. First, I de-spoked my Shimano 105 hubs from their old, worn, Mavic MA3 rims, and serviced them. Front hub:
 Then the rear one. I tend to open the nuts on one side only, and then draw the axle out.
The balls were ok, just needed stripping, cleaning, re-greasing and re-assembly. I tried to work some thick oil into the freewheel too.
A few weeks later, beautifully built by Hewitt on Mavic CXP33 rims:
 The spoke lacing and tension is simply excellent.
Hewitt have a reputation for quality wheels for a good reason. I can't wait to ride them and will update this post after I have done so.


Wednesday 1 February 2012

Graham Weigh Cyclocross Frame - Update

Here's an update on the bike I built up a few months ago.
And racing - bit of fun blurring up my face there! 
The steerer has been cut down to my preferred height. I used a Rothenberg pipe cutter for this - great tool - I'd recommend it. Saddle is a ProLogo Kappa, not expensive and fine so far for cyclocross, if a bit narrow for my "a-few-too-many-puddings-hips". Wheels are Mach1 Omega rims on Shimano Tiagra, 32h, shod with Michelin Mud 2 folding tyres - cheap as chips and go ok. There's a seat pack which obviously will be removed for racing. I've enjoyed this bike - three races so far, and all is well.

 That's the end of this 'cross season. I'm really looking forward to the next one!

Friday 7 October 2011

Cyclocross bike build: Graham Weigh Frame

Last year I tried cyclocross for the first time. I adapted my wife's hybrid for that, but she wants her bike back (iow, I want a real CX bike!) so I decided to build one up for this year. Below, the frame and forks. Graham Weigh 60cm alloy, which seems to be very similar to a Dolan cross frame. Kinesis Crosslight alloy forks. I was a bit worried about harshness of ride, but we'll see.
Below are the headset parts. It'a an Alpina integrated, I realise all the hullaballoo about integrated headsets versus external bearing ones, but as the frame is designed for this kind of headset, I thought I'd give it a go. It assembles, from bottoms up: crown race (silver ring), lower bearing (which drops straight into the bottom housing of the head tube), upper bearing (identical to the lower one and drops into the top head tube bearing housing), red compression ring, silver washer, top cover (black alloy, it has an o-ring inside it, and the black rubber washer/gasket goes under it), cap and star-fangled nut.

Below, a close up of the top bearing housing in the head tube, and the mount for the crown race. It's all incredibly simple and quick to assemble, dead easy I'd say.
Bumble-bee style headset spacer arrangement. Actually, I didn't want to chop the steerer, so decided to leave it full size for now. Hmm, that's a good name for the bike: BUMBLE-BEE, because I'll be bumbling about on it!
A little while later, Bumble-Bee is finished:
The wheels are Shimano 105 hubs on Mavic Bog Standard rims (32h MA3). Below, a cheepo Vitus saddle. That'll do for now, but I WILL experiment later - for the sake of my behind! One day I'll get the hang of those flying remounts... Maxxis Raze 700x35 tyres (wired). Not the best, but hey, neither is the engine!
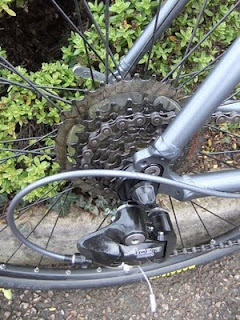
Rear derailleur is a Sora. It's a really nice changer in my view, works very crisply with the Tiagra shifters.
Rear view of Tektro CR720 cantilever brakes. So much nicer than my old touring bike (which I sold a long time ago). The cable hanger is part of the seat clamp (Alpina). You can see that the cable is not perfectly straight and vertical, so there's room for improvement here.
Front view of Bumble-Bee below, showing the Tiagra shifters mounted on 44cm (c-c) Ritchey Comp bars. I found the shifters surprisingly easy to rig up and cable.
Close up of the front brakes below. Initially, I had the Mother of all Judders. This was easily rectified by a few mins with an allen key and a bit of card, getting the blocks nicely lined up to the rim, and with a slight toe in.
Bottom Bracket is a Shimano UN54 square taper. Cheap, reliable and simple. Front changer Sora triple, working a Stronglight 46-36-26 chainset. Although rated for a bigger road chainwheel, I encountered no problems at all encouraging it to work for the three MTB size rings here. Bottom gear is an amazing 26T front-27T rear! Now that's 26 inches! If I'm gonna have granny gears, then I may as well have ridiculously low ones. Yeah, I'm unlikely to use them in racing, but may do so if I take Bumble-Bee touring later.
Final photo below showing off Bumble-Bee's backside. Is that a sting in her tail?
All in all, I'm very pleased. She handles really well on grass and compared to the old hybrid, I'm loving the riding position, and no qualms at all about the alloy forks - they're great. Having only ever ridden cross with straight handlebars, I was worried about the change to drop bars. Would they give me enough steering control for tight corners? In practice, the 90mm stem and 44cm bars turned out to be absolutely fine. Indeed, I prefer the drop handlebars.

Thursday 27 January 2011

How to Shimergo your bike

Campagnolo ERGO levers can work with a SHIMano drivetrain, mechs and cassette. In an earlier post here, I showed some photos of a bike that I had converted to Shimergo. Now I'm going to explain how I did it. Here's a photo of the bike as it was originally. The brake levers are cheap and nasty.

The plan was to replace the brake levers and down tube shifters with Campagnolo Ergo levers (Veloce 10 QS Ergo Levers, from around 2009 vintage). The following links are essential reading:

The CTC's Chris Juden on the subject: http://www.ctc.org.uk/desktopdefault.aspx?tabid=3946
CX Magazine on it: http://cxmagazine.com/shimano-campagnol ... patibility
10spd, 8spd success story: http://bikesarethesolution.wordpress.co ... onversion/

Original set up was as follows:

Cassette: Shimano 9 speed, 12-23
Rear mech: Shimano Tiagra
Front mech: Campag Mirage
D/T Levers: Shimano Dura ace
Chainset: Stronglight Impact Triple 28-38-48

According to the above links, the lever swap should work with a little trick to play on the rear mech, namely, the cable attachment bolt washer to be spun round - or "hubbubed".

There's a lot more writing out there, but the above three really convinced me. Plus I saw a forum posting somewhere in which a cyclocross racer reported a season's worth of racing using 10spd Campy shifters on 9spd Shimano with hubbub. That clinched it for me!


Old faithful Shimano Dura Ace down tube levers (9 speed indexed). I'll end up removing these (gulp!)

These cheepo brake levers are going to go too. I'll be happy about that!

First step is to take the old bar tape and levers off.

New 10 Speed Campy levers on. I needed to buy a Torx T25 tool for the main lever clamp bolt. The Veloce levers feel superb in the hand, almost perfectly shaped hoods.


Cable housing fitted for brake and gears, taped down ready for handlebar tape.

The old down tube levers were replaced with Campagnolo resin cable stops. Although inexpensive, these turned out to be simply brilliant. So easy to adjust, even while riding.


This is the hubbub clamping arrangement. All you do is rotate the clamp hook, run the cable over the hook, and tighten the bolt as shown. Dead easy.


Swanky new bar tape. Now, to my total amazement, both the new levers worked beautifully with NO adjustment needed at all. After a few days riding, I had to adjust some cable tension from the down tube cable stops, but that was it. I believe in Shimergo now!

Campagnolo levers added a touch of modern class to a good ol' Reynolds 531C road bike. Apart from being able to change gear without moving hands from the bars, another benefit was improved braking performance.

Sunday 23 January 2011

Cyclocross on a Hybrid Bike

Wanting to try cyclocross, I adapted my wife's hybrid bike. It is a Ridgeback Velocity that we bought in 2009. Here it is after being turned into a beginner's crosser. In the process, it lost 0.6kg, from 12.6 to 12.0kg. This is what I did to it:

-100g : Removed reflectors, bottle cage, bell
+100g : Replaced plastic cage pedals with metal Shimano MTBs
-300g : Replaced cushion saddle with a racier one, Vitus brand
-300g : Replaced Continental Contact tyres with Maxxis Raze 700x35C
+/-0g: New Clarks brake blocks

TOTAL : -600g

More photos below.

Heavy mud soon collects on the bike and on your shoes! Actually, I had scraped the worst of the mud off before taking these photos. It's a messy, but fantastic fun and a great workout.