Why didn't I buy this earlier?! Yes, it's relatively expensive, but within a year I've used it on 6 bikes and am very happy with the results. Why? Because it improved rear mech changing performance hugely. In some cases, transforming a noisy, crunchy, chain-scruncher to a beautifully efficient "click-whirr"! In my view the tool has easily paid its way already.
I had bought the tool for when the bike may have pranged on something, or fallen on to the drive side, putting the hanger visibly out of alignment. But to my surprise, it's been very helpful for new bikes too. Which tells me that alignment is not always (hardly ever?) checked when a new bike or frame goes out the shop-door to a customer!
The purpose of the thing is to ensure that the rear mech is well-aligned with the sprockets on your back wheel. More precisely, the tool ensures that the plane of the cassette's sprockets is
normal to the rear mech fixing bolt hole axis in the derailleur hanger.
If you have trouble adjusting rear mech cable tension to get smooth shifting in both directions, or an otherwise sub-standard rear transmission, just take a quick look at the alignment of your rear mech pulleys and the sprockets. If they are not coplanar, then use this tool to fix it. In the past, I tried realigning by hand, and while it can improve things, the tool allows you to align accurately. Once that alignment is decent, the rear mech can do its thing properly. Suddenly, your transmission works beautifully.
Although it's a simple-looking tool, I can see that a lot of thought has gone into its design. There are various factors to consider in the design of such a tool:
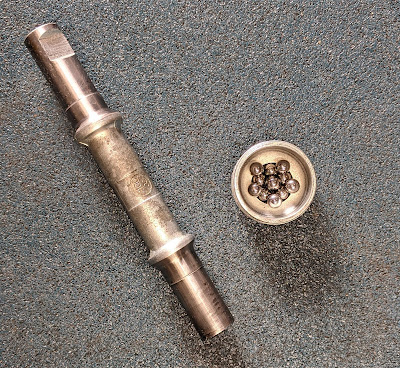
1. Robustness and longevity. The lever needs to be stiff enough, and the attachment to the hanger strong enough. This is because the lever is used to manually bend the hanger. No problem here with the Park Tool. The lever is strong and the rotating bolt is a good tight fit in the heavy housing. Moreover, the threaded end bolt can be removed (it has an allen key socket in it) and replaced. Here's a photo of the main bolt pin removed (need to remove a grub screw):
2. Must fit. Look at a bunch of bikes in a shop, and you'll see a variety of positions of the derailleur hanger bolt hole with respect to rear dropouts, wheel axle, etc. So, the tool has to be able to attach to all these types. I've had no issues with this so far, and I think this is because the part of the tool that houses the bolt is fairly narrow diameter.
3. Ability for the indicator to be moved in and out without losing the setting. The tool has to be used while on the bike (because the hanger is on the bike!). Therefore, the indicator has to be moveable to get around at least, the chain stays and then any other parts hanging about, such as racks, mudguard arms, or even the derailleur itself (if all you've done is unbolted it and let it hang free). The indicator on the tool achieves this with a small knob, and small O-rings to keep the setting as you move it in and out.
Tips and Learnings
1. What I've learned recently, is that even small improvements in hanger alignment can cause big improvements. These kinds of misalignment are not that easy to see with the eye alone, but the tool can detect it. I suppose this is because the indicator looks at the rim positions which is a long distance from the sprockets.
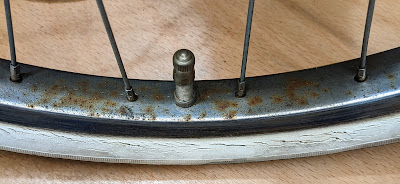
2. I put something on the wheel in the bottom dead centre position, e.g. the tyre valve. Throughout the testing and alignment process, I ensure that the valve remains in that spot.
3. Take off the rear mech. If the hanger is removable, unbolt it and clean it. Grease the bolts and refix it securely before you start the alignment procedure. Sometimes, the issue is not alignment, but rather hanger tightness!
3. CAREFULLY screw the tool into the mech hanger hole - really really really don't want to cross threads here!
4. The procedure I've used that has worked well starts with first using the indicator to look at the top and bottom of the wheel rim to work out which way the hanger is bent in or out from the wheel. (This requires sliding the indicator housing, because the rear mech hole is not in the wheel centre). Then look at the back of the wheel rim and front of the wheel rim (which requires maneuvering the indicator around the chainstay) to figure out which way the hanger is toed in or out from the wheel's plane.
5. Then, spend a few seconds (minutes?!) to visualize how the hanger is aligned with respect to the wheel in your mind BEFORE you bend anything.
6. Make the first bend. So far, I have gone for a horizontal and vertical approach: (1) with the lever horizontal to correct toe-in/out, and (2) with the lever vertical to correct push-in/pull-out. In other words, I get the alignment satisfactory with the lever vertical or horizontal, then get the alignment satisfactory in the other direction (lever horizontal or vertical).
7. I try to minimize the number of bend attempts, because metal fatigues! A couple of mm difference in the indicator positions at the rim doesn't seem to make much impact, so it doesn't seem worth bothering to get mm perfection. Remember that whatever the "gap" is on one side, you only have to bend the hanger
half that amount to get it aligned.
8. After correcting both vertically and horizontally, I go back to 4 above and quickly recheck all is good and that the hanger plane is close to parallel to the wheel plane.
9. The knob on the indicator slider and the small O-rings on the indicator work fine. However, I've found that the O-rings will disintegrate over time. I need to get more of them, but at least O rings are easy to find online and cheap.
10. Clean and grease the main bolt pin (see photo above), or perhaps a drop of oil every now and then to keep the bearing smooth. A good idea to keep it easy to screw into the mech hanger hole.
Here's
a video from Park Tool of the thing in use.
Park Tool have done a super job with this tool and I recommend it highly. Just get a small bag of replacement O rings.


