Showing posts with label transmission. Show all posts

Monday 29 March 2021

Raleigh Twenty: Front hub service, removing rust chrome wheels

The 46T 165mm crankset off the BSA 20 is utilitarian, but good looking, after the rust is removed and the chrome polished. I especially like the little "Nottingham Knight" stampings. Virtually unworn teeth:


OK, it's cottered, but I'll make sure to assemble it with anti-seize. I tried removing some rust with Aluminium foil and water, and while it works, it can cause scratches, probably because solid particles can get dragged about under the metal foil. I prefer using 0000 wire wool with WD40. That removes rust quickly and minimises scratching. Here are some before and after shots:

And another one:


In this one, the bottom part of the front hub has been cleaned, but not yet the top part. You can see the yucky grease solidified into varnish. Easily cleaned with WD40 and a small piece of green plastic scourer. This is probably the first time the hub has been opened since 1978! 


Note also the 3 cross spoke pattern, but interestingly, the crossing spoke goes over the first, second AND third spokes, not under the third, as is often the case on larger wheels with 3 cross lacing. And here's the other side, all clean, ready for balls (10 BB each side of 3/16"):

Like the chainset, there's a lot of character in these late 70s Raleigh Sturmey Archer front hubs. They are actually very well thought out in my opinion, as I'll describe further below. 


Here are the parts. Note that both cones have a small flange turned on them, but only one cone, the moveable one, has flats to make it a nut. That's because it is used to adjust bearing play - while the hub is on the bike! The other cone on the axle is intended to stay fixed - there's a stop on the axle to prevent it passing further along the thread. Note that neither cones have locking nuts (90mm across the outsides of the cones). 


You have to hand spring the front fork slightly opening the front dropouts a tad to let the flanges of each cone fit in. I measured my forks at 87mm across the insides, so that's a decent 3mm spring. Once in though, the hub will stay put, held by the cones, even before you put the nuts and washers on the outside of the forks. So, the clever bit is that you can adjust bearing play by sliding a cone spanner inside the fork on to the flats of the cone nut, and turning slightly. Once set, tighten the outside washers and axle nuts, and that holds it all down. Quite neat and clever and they run pretty smoothly (even this one despite the wear groove in the cone). Just remember to put the fixed cone on the right (drive side) of the bike, because on the other side, there will be a natural tendency for the bearing to tighten, which can be harmful to it. As an experiment, assemble and hold the axle ends in your hands, give the wheel a spin and fiddle about - it's easy to see the natural tendency of the bearing to tighten up when the fixed cone is on the left, and the natural tendency to loosen with the fixed cone on the right. But don't worry, they won't loosen in use, because the external nuts lock everything in position. 

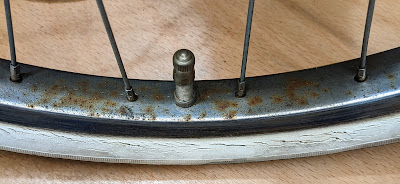
For the inner tube side surface of the rims, I simply spray a bit of WD40, brass wire brush and then a quick going over with a slightly coarser steel wool. Wipe it off with a small cotton bath towel, and hey presto, clean insides ready for rim tape. For the Sturmey Archer AW I merely oiled it using a cheap plastic pipette and 1:3 mix of car transmission fluid to 5W engine oil. The pipette allows a small measure to be squirted easily into the oil port. That three speed tickety tick! As they say, AW stands for Always Works...


So here they are, shiny chrome wheels, and hubs, bling bling! After a bit more tightening and truing, I'll dress them in new white-wall shoes. 

Saturday 23 March 2019

Dawes Impulse, Reynolds 531, Shimergo

Here's a comfortable ride that I recently acquired via an internet sale:


And here is what it looked like on purchase, before I sorted out the handlebars, changed the front wheel, and fettled the brakes:

Here are extracts from 1990 Dawes catalogue:

And some blurb and data:

Rest of the catalogue data:

In my sample, it seems that quite a few parts have been changed. However, I think the original chainset Exage Biopace 52/42T 170 and brake levers were still on. The gearing was a bit insane, with a Shimano Uniglide 6 speed hub, and lowest gear of 42-21T (53"). But, it shifted well. So, I changed the bottom bracket from the cone and axle cotterless to a sealed cartridge Shimano 110mm unit, and the chainset to a 46/36T 175. This gave much more manageable gears with a low of 36-21T (45").

And here's a photo of it today, with the new chainset, saddle, seatpost, tyres and the as purchased front wheel back on:

Next step is to get rid of the DT shifters in the most convenient way possible. I love DT shifters, but one has to admit that bar-mounted shifters are better. The rims are grey anodised Mavic-MA40 and are virtually new - definitely not what was on the machine as shipped by Dawes. These rims have been rather nicely laced on to decent refurbed hubs - Campagnolo in front and Shimano FH-RM50 ND (6 spd Uniglide) at rear. Not only that, the 6 speed system is shifting well, so I'm minded to leave it as is.

I measured the pitch (distance between sprocket centres) as best I can, and made it 5.5mm. Consulting references on Shimergo - btw, I'm really annoyed with the CTC and their shoddy reproduction of Chris Juden's article on the subject - tables are chopped-up/wrong/missing! - I'm minded to try simply fitting second hand Campagnolo 8 speed Ergo shifters. The undoctored chart (Table 4) indicates that with the 'hubbub' rear mech clamp tweak, there would be ~0.03mm discrepancy in cog pitch, so it ought to work.  I have some DT stops already in my bike bits. The 1990s 8 speed Campagnolo shifters that I've seen for sale often have splits in the brake hoods. I'll probably have to get new hoods, but that's not a big deal. Even if I'd not bothered with a Shimergo mod, I'd have had to buy replacements for the current tatty and discoloured gummy ones. They are supposed to be white, but they've disintegrated to beige.

However, the rear mech does not appear to have a hubbub-able cable clamp! That said, old style Campagnolo 9 speed shifters give a pitch of 5.49mm, whereas the new style ones of same speed provide 5.26mm. This is going to be interesting...

Excited to try this and blog about it later.

Saturday 28 April 2018

Park Tool Derailleur Hanger Alignment tool DAG 2.2 - Review

Why didn't I buy this earlier?! Yes, it's relatively expensive, but within a year I've used it on 6 bikes and am very happy with the results. Why? Because it improved rear mech changing performance hugely. In some cases, transforming a noisy, crunchy, chain-scruncher to a beautifully efficient "click-whirr"! In my view the tool has easily paid its way already.


I had bought the tool for when the bike may have pranged on something, or fallen on to the drive side, putting the hanger visibly out of alignment. But to my surprise, it's been very helpful for new bikes too. Which tells me that alignment is not always (hardly ever?) checked when a new bike or frame goes out the shop-door to a customer!

The purpose of the thing is to ensure that the rear mech is well-aligned with the sprockets on your back wheel. More precisely, the tool ensures that the plane of the cassette's sprockets is normal to the rear mech fixing bolt hole axis in the derailleur hanger.

If you have trouble adjusting rear mech cable tension to get smooth shifting in both directions, or an otherwise sub-standard rear transmission, just take a quick look at the alignment of your rear mech pulleys and the sprockets. If they are not coplanar, then use this tool to fix it. In the past, I tried realigning by hand, and while it can improve things, the tool allows you to align accurately. Once that alignment is decent, the rear mech can do its thing properly. Suddenly, your transmission works beautifully.

Although it's a simple-looking tool, I can see that a lot of thought has gone into its design. There are various factors to consider in the design of such a tool:

1. Robustness and longevity. The lever needs to be stiff enough, and the attachment to the hanger strong enough. This is because the lever is used to manually bend the hanger. No problem here with the Park Tool. The lever is strong and the rotating bolt is a good tight fit in the heavy housing. Moreover, the threaded end bolt can be removed (it has an allen key socket in it) and replaced. Here's a photo of the main bolt pin removed (need to remove a grub screw):


2. Must fit. Look at a bunch of bikes in a shop, and you'll see a variety of positions of the derailleur hanger bolt hole with respect to rear dropouts, wheel axle, etc. So, the tool has to be able to attach to all these types. I've had no issues with this so far, and I think this is because the part of the tool that houses the bolt is fairly narrow diameter.

3. Ability for the indicator to be moved in and out without losing the setting. The tool has to be used while on the bike (because the hanger is on the bike!). Therefore, the indicator has to be moveable to get around at least, the chain stays and then any other parts hanging about, such as racks, mudguard arms, or even the derailleur itself (if all you've done is unbolted it and let it hang free). The indicator on the tool achieves this with a small knob, and small O-rings to keep the setting as you move it in and out.

Tips and Learnings


1. What I've learned recently, is that even small improvements in hanger alignment can cause big improvements. These kinds of misalignment are not that easy to see with the eye alone, but the tool can detect it. I suppose this is because the indicator looks at the rim positions which is a long distance from the sprockets.

2. I put something on the wheel in the bottom dead centre position, e.g. the tyre valve. Throughout the testing and alignment process, I ensure that the valve remains in that spot.

3. Take off the rear mech. If the hanger is removable, unbolt it and clean it. Grease the bolts and refix it securely before you start the alignment procedure. Sometimes, the issue is not alignment, but rather hanger tightness!

3. CAREFULLY screw the tool into the mech hanger hole - really really really don't want to cross threads here!

4. The procedure I've used that has worked well starts with first using the indicator to look at the top and bottom of the wheel rim to work out which way the hanger is bent in or out from the wheel. (This requires sliding the indicator housing, because the rear mech hole is not in the wheel centre). Then look at the back of the wheel rim and front of the wheel rim (which requires maneuvering the indicator around the chainstay) to figure out which way the hanger is toed in or out from the wheel's plane.

5. Then, spend a few seconds (minutes?!) to visualize how the hanger is aligned with respect to the wheel in your mind BEFORE you bend anything.

6. Make the first bend. So far, I have gone for a horizontal and vertical approach: (1) with the lever horizontal to correct toe-in/out, and (2) with the lever vertical to correct push-in/pull-out. In other words, I get the alignment satisfactory with the lever vertical or horizontal, then get the alignment satisfactory in the other direction (lever horizontal or vertical).

7. I try to minimize the number of bend attempts, because metal fatigues! A couple of mm difference in the indicator positions at the rim doesn't seem to make much impact, so it doesn't seem worth bothering to get mm perfection. Remember that whatever the "gap" is on one side, you only have to bend the hanger half that amount to get it aligned.

8. After correcting both vertically and horizontally, I go back to 4 above and quickly recheck all is good and that the hanger plane is close to parallel to the wheel plane.

9. The knob on the indicator slider and the small O-rings on the indicator work fine. However, I've found that the O-rings will disintegrate over time. I need to get more of them, but at least O rings are easy to find online and cheap.

10. Clean and grease the main bolt pin (see photo above), or perhaps a drop of oil every now and then to keep the bearing smooth. A good idea to keep it easy to screw into the mech hanger hole.

Here's a video from Park Tool of the thing in use.

Park Tool have done a super job with this tool and I recommend it highly. Just get a small bag of replacement O rings.