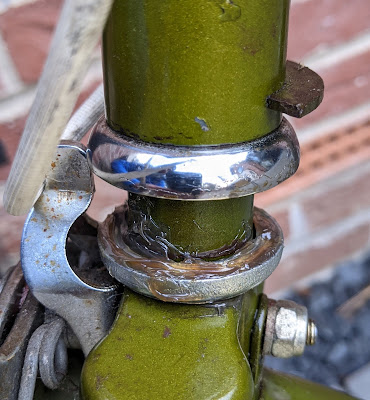
The headset arrangement on a Raleigh 20 is a little bonkers in my view. The bottom part is a conventional ball bearing race, and really quite good. The top half is the bottom half's Frankenstein brother. In this sequence of photos I'll show you details, as I open up this BSA 20 for inspection, cleaning and lubrication. (For replacing the top part, see this previous post). Here's the front view:
Now remember that the stem has restricted vertical movement in the steerer, because of a wire loop tie inside at its foot. I don't have a photo of that here, but when I get the wheels and mudguard off next, I'll try to take some pictures. For now, note that the stem can be lifted up a little, but cannot be taken out. Below is a pic of the top part of the headset. From the top: stem, top lock nut, light bracket, second lock nut (hidden by the light bracket), stem-steerer clamp, and a metal top cap:So, straight away you can see that the clamp squashes between the lock nuts above it and the head tube bearing below it. This is a less than ideal situation for good bearing preload. Let's open up from the top:
With the nut off and light bracket lifted, you can see the second lock nut properly. Unscrew that second lock nut and raise the parts:I've taken off the clamp lever in the photo above. Note that the bolt has a square flange and can be removed to allow the clamp to lift up easily over the threads. You can see the metal top cap has indentations on its lid. That's what I mean by not ideal for bearing preload - the clamp interferes with the even downward force of the lock nuts. And beneath, you can see the top edge of the infamous nylon bushing. How does the clamp join the stem to the steerer tube I hear you ask? Well, because of this cut out
You can see how the clamp edges push on the sides of the T shaped cut to press the steerer on to the stem tube. Obviously, the designer was trying to deal with how to raise and lower a stem without having to deal with expander bolts as in a regular quill stem. It just about works, but I would not describe it as an elegant solution! This time, I was not replacing the top bearing, merely inspecting, cleaning and lubricating. I used a drop of thick gearbox oil around the inside of the nylon bushing to help the steerer tube rotate inside it. Don't put too much in there, because you need the stem to clamp to the steerer and excess lube might mess that up.
Finally, I serviced the bottom race, which is fiddly without taking the stem out, but can be done. Just make sure you have a sheet on the floor to catch any loose ball bearings when you first lift it up. When I did that, the ball race was dry, with a bit of hard stuck grime on the race that needed to be removed. Below, is a photo of the bottom bearing opened up, the 25 balls of 5/32" removed, cleaned, greased up ready for the shiny balls to be placed on the lubed cup.
The bottom cup is pretty chunky as you can see, and merely sits on the fork crown. In this example it was not a tight friction fit, as compared to a regular crown race on a typical fork.
In a previous post (search on Raleigh Twenty Project) I showed some pictures of the headset replacement that I did on a blue Triumph Trafficmaster 20. Although I kept good photos of the nylon bushing and bottom race, I didn't make a thorough a photo record of how I fitted the 1" threadless top bearing. So when I do the next one, I'll take more photos of how to get rid of that nylon bushing and replace it with proper bearings.
This time, though, I was only inspecting, cleaning and lubing. It was enough to improve the steering of this particular "shopper bike". While it's better than before, I know it can be improved a lot more, but that would require this stem to be untied from its base, chucking the clamp, fitting a new quill stem, which probably means new handlebars, etc. By the way, another approach is to completely replace the forks and headset (the head tube diameter is relatively conventional traditional size).
However, my plan for this bike is not really modernisation, but rather rejuvenation with judicious restoration. Which is what working on this cycle and riding it gives me a bit of!


No comments:
Post a Comment